Bind Domain
How to Bind domain in QuickCreator?
If you have properly configured a DNS record pointing to ssl.mylandingpages.co in your DNS registrar, wait for the DNS record to take effect and you can save your custom domain in QuickCreator, QuickCreator will attempt to generate an SSL certificate for you.
Use Subdomain
Config your subdomain
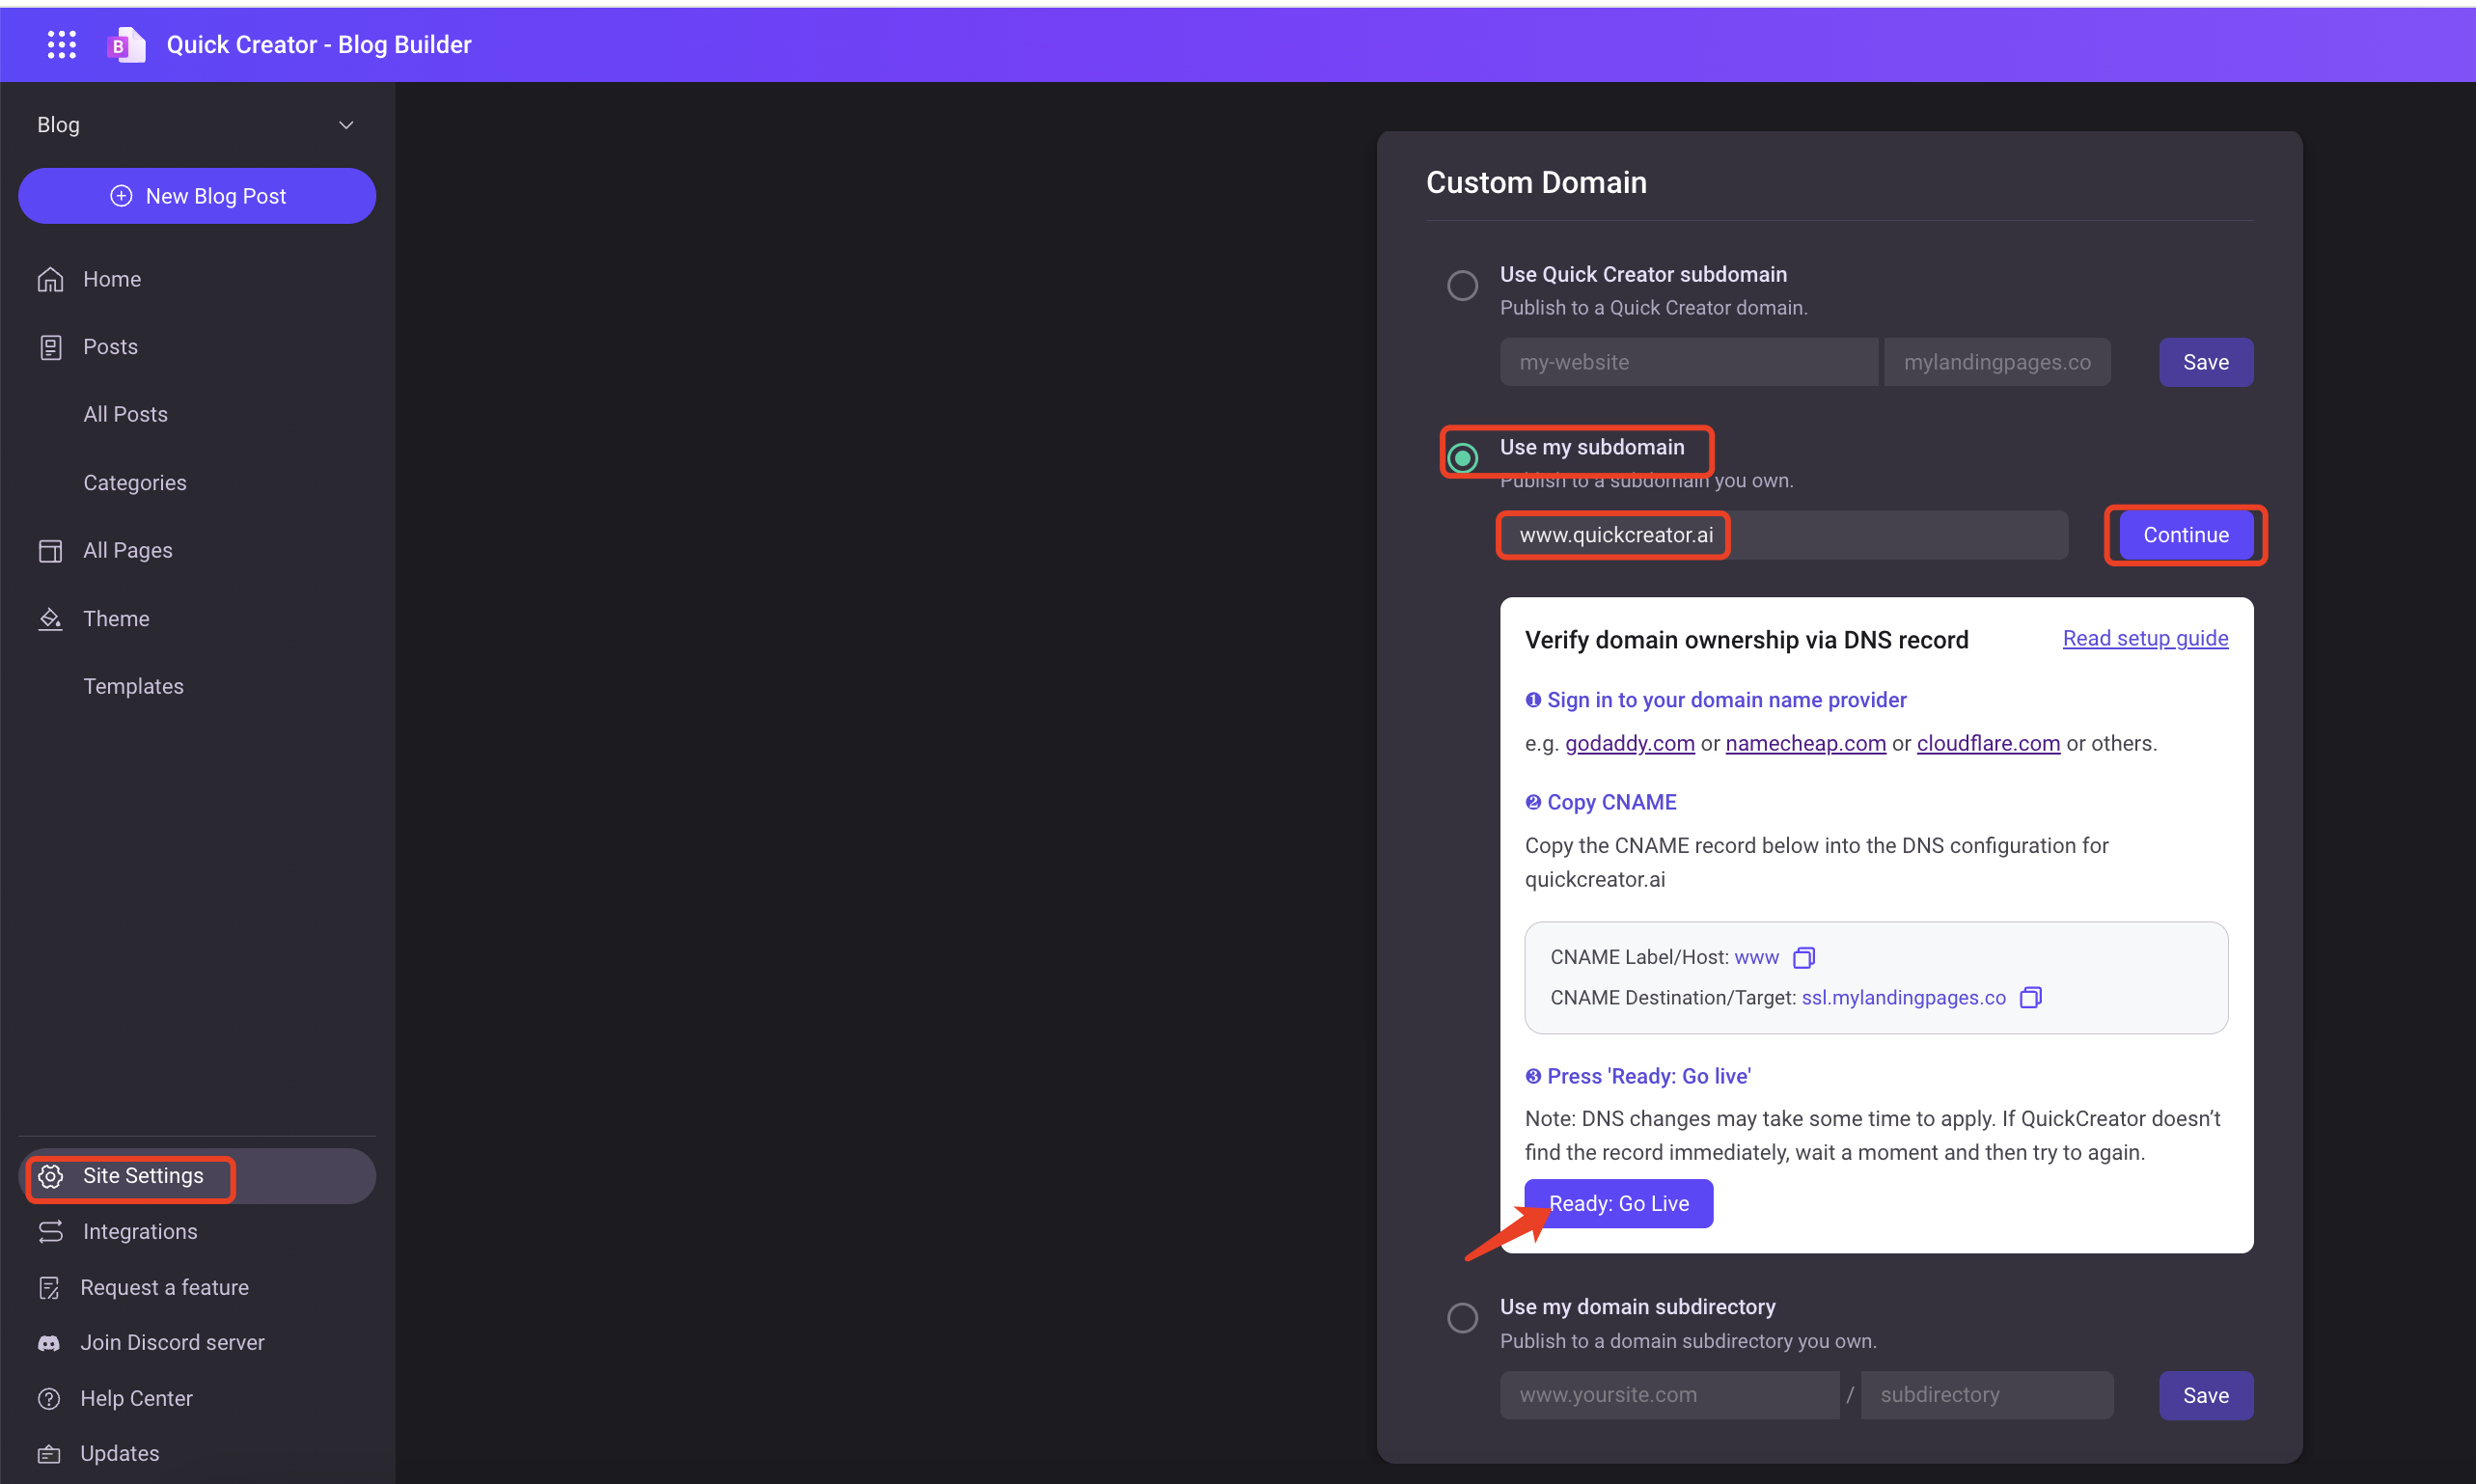
Click "Site Settings" and then select "Domain Name". You can enter your domain name, such as blog.example.com, and then click "Configure DNS " to get DNS record information.
DNS verification
Click "Ready: Go Live" for DNS verification.
The first thing we'll do is to check and see if the correct DNS record has taken effect. Once we've been able to detect this, you'll see a green checkmark indicating that it is successful.
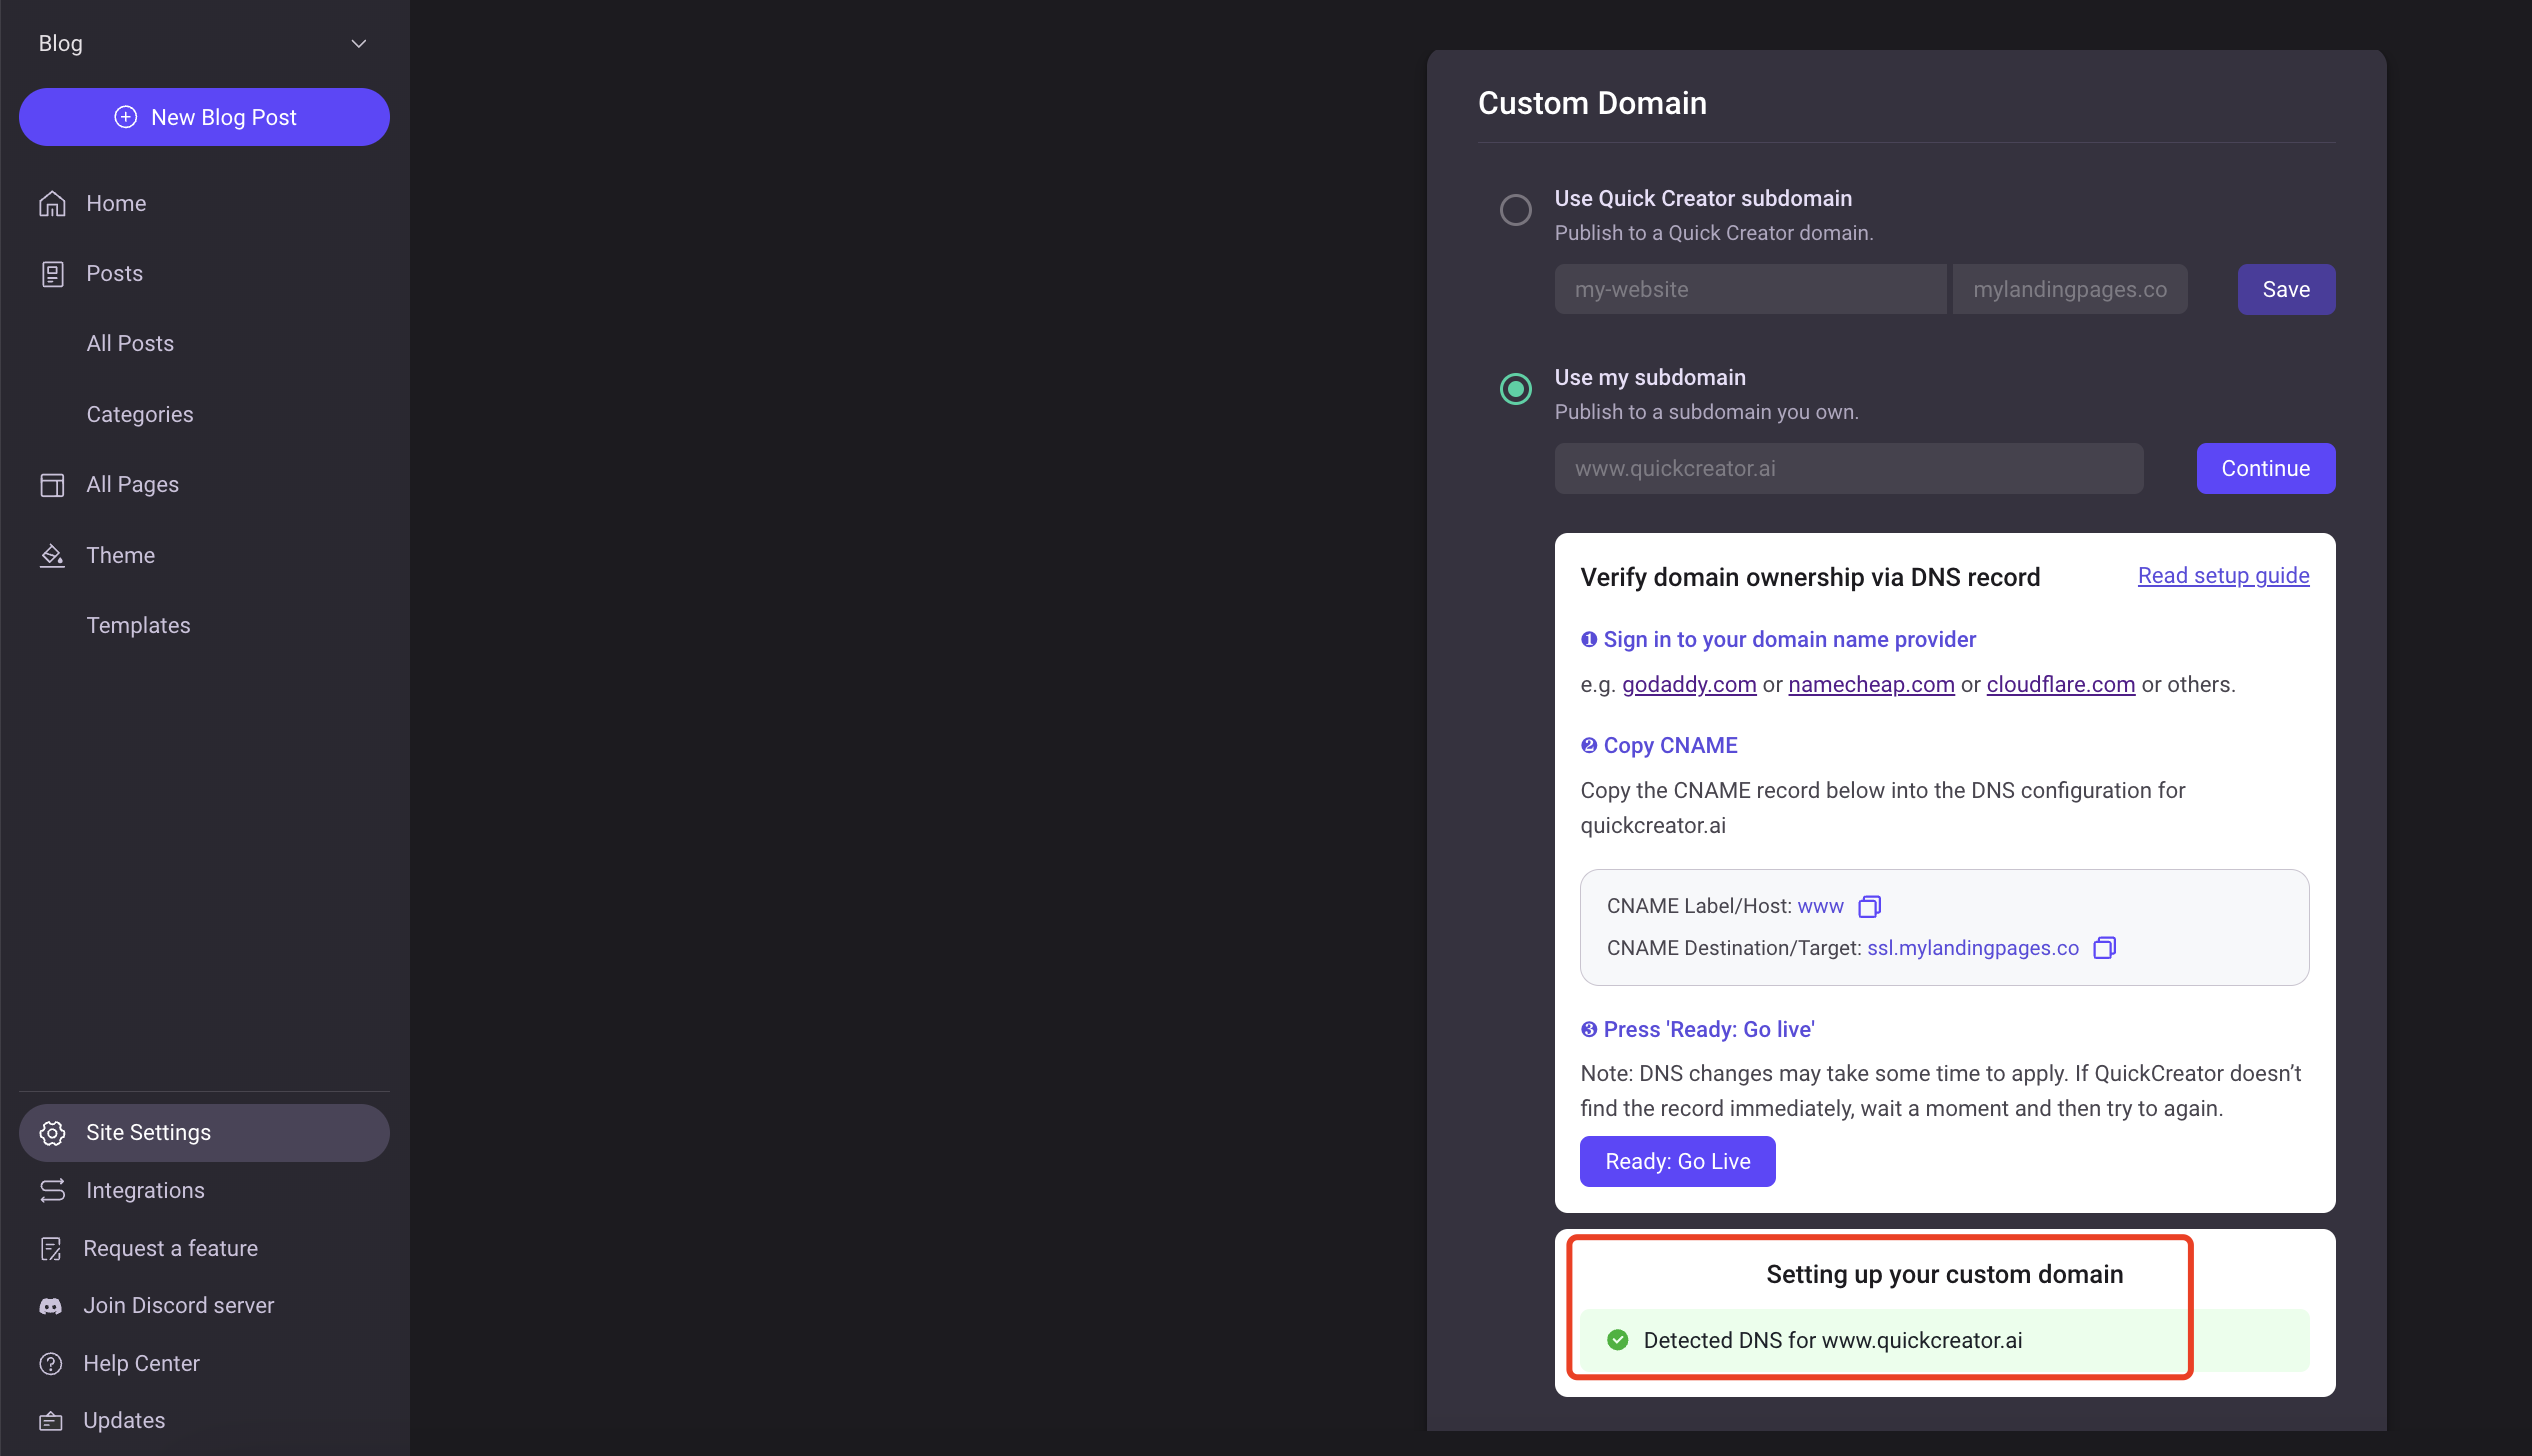
Next, we'll configure an SSL certificate for the custom domain automatically, then you can use your custom domain to access it. If the DNS record is not taking effect you can check the configuration and then wait a while before clicking retry to re-verify.
Use Subdirectory
To configure a QuickCreator site to a subdirectory of your site, you need to confirm that you have a proxy server and that the proxy server supports that. We have tested with Apache, Nginx, IIS, Cloudflare , Netlify, Cloudfront ,Vercel, NEXT.
URL proxying with Nginx
Set up a reverse proxy using nginx.
For example, you have an existing website such as www.example.com that is hosted on your servers, while also hosting a QuickCreator-managed blog at www.example.com/blog. Using a reverse proxy, the blog would appear to be hosted from the same server as the website when it's actually coming from QuickCreator's servers. There are several best practices to keep in mind:
Config your domain and subdirectory
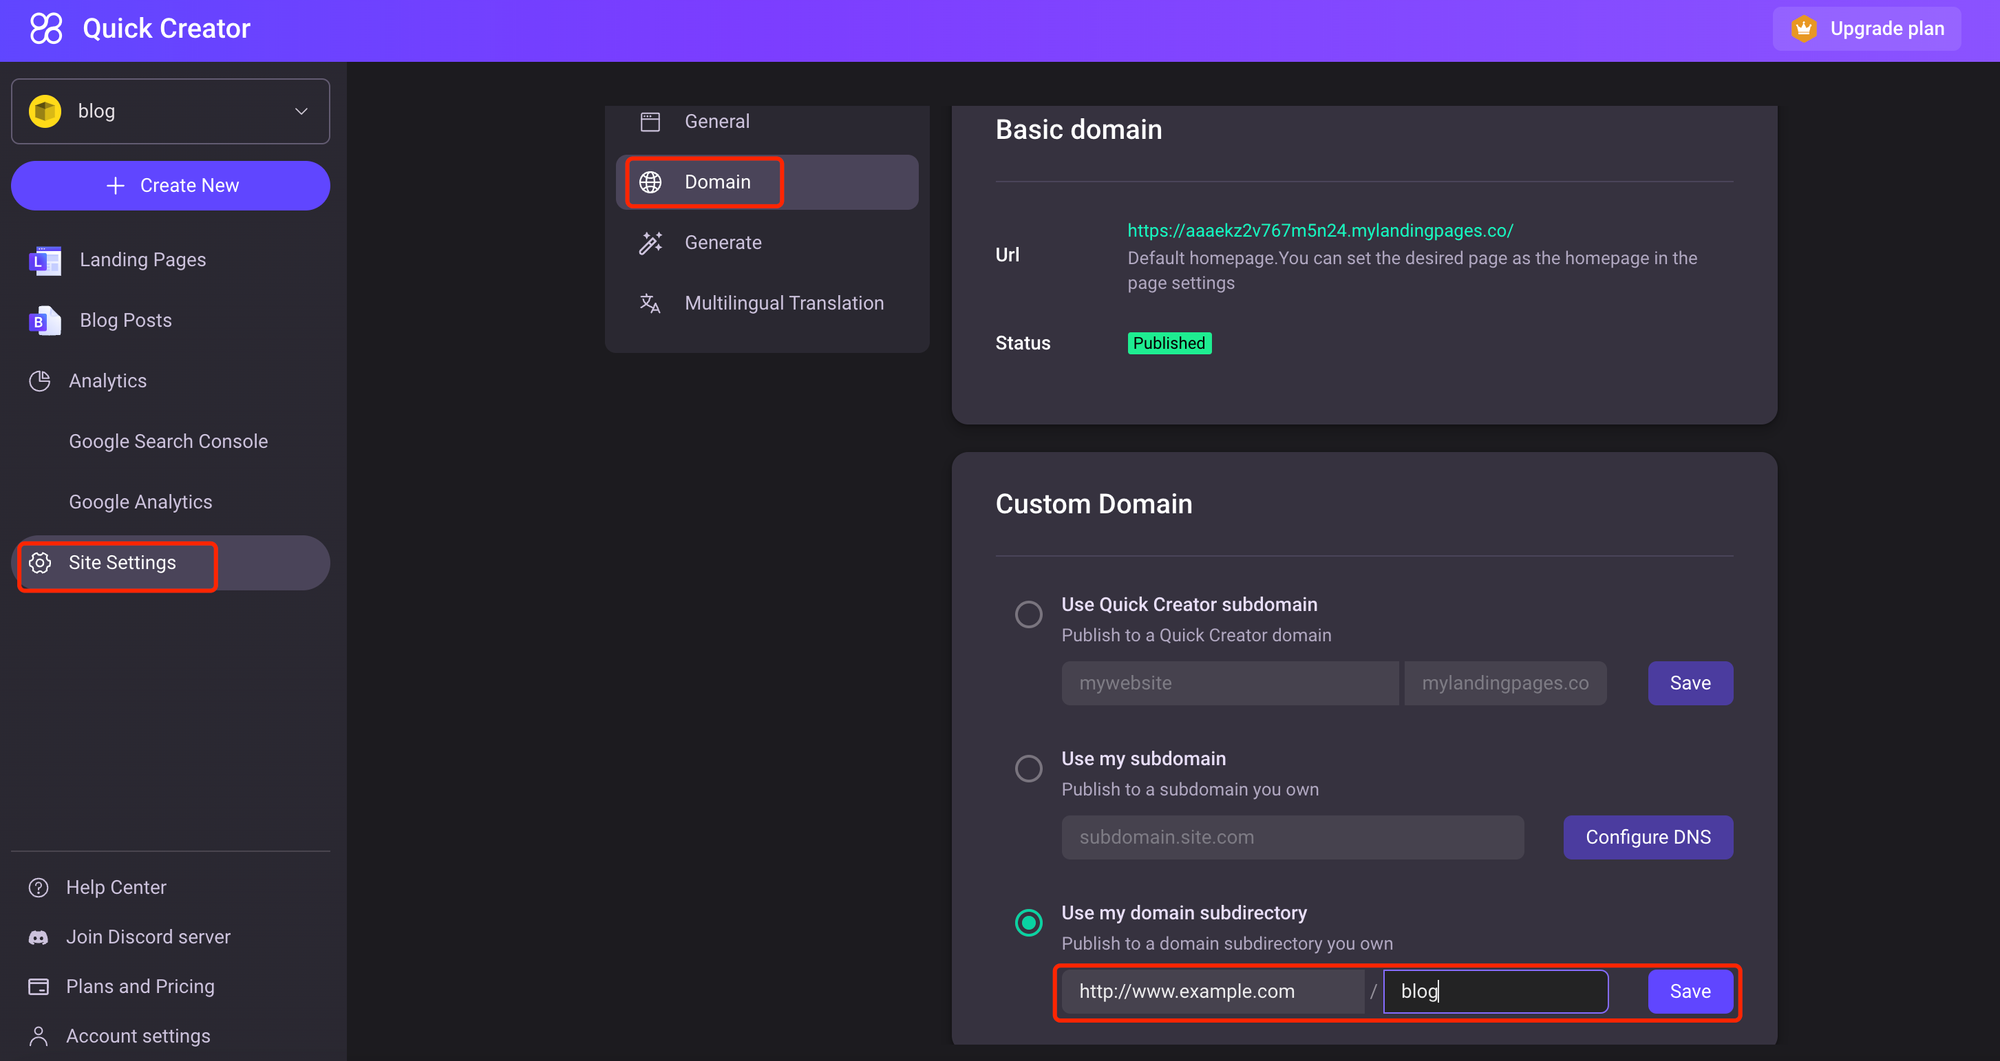
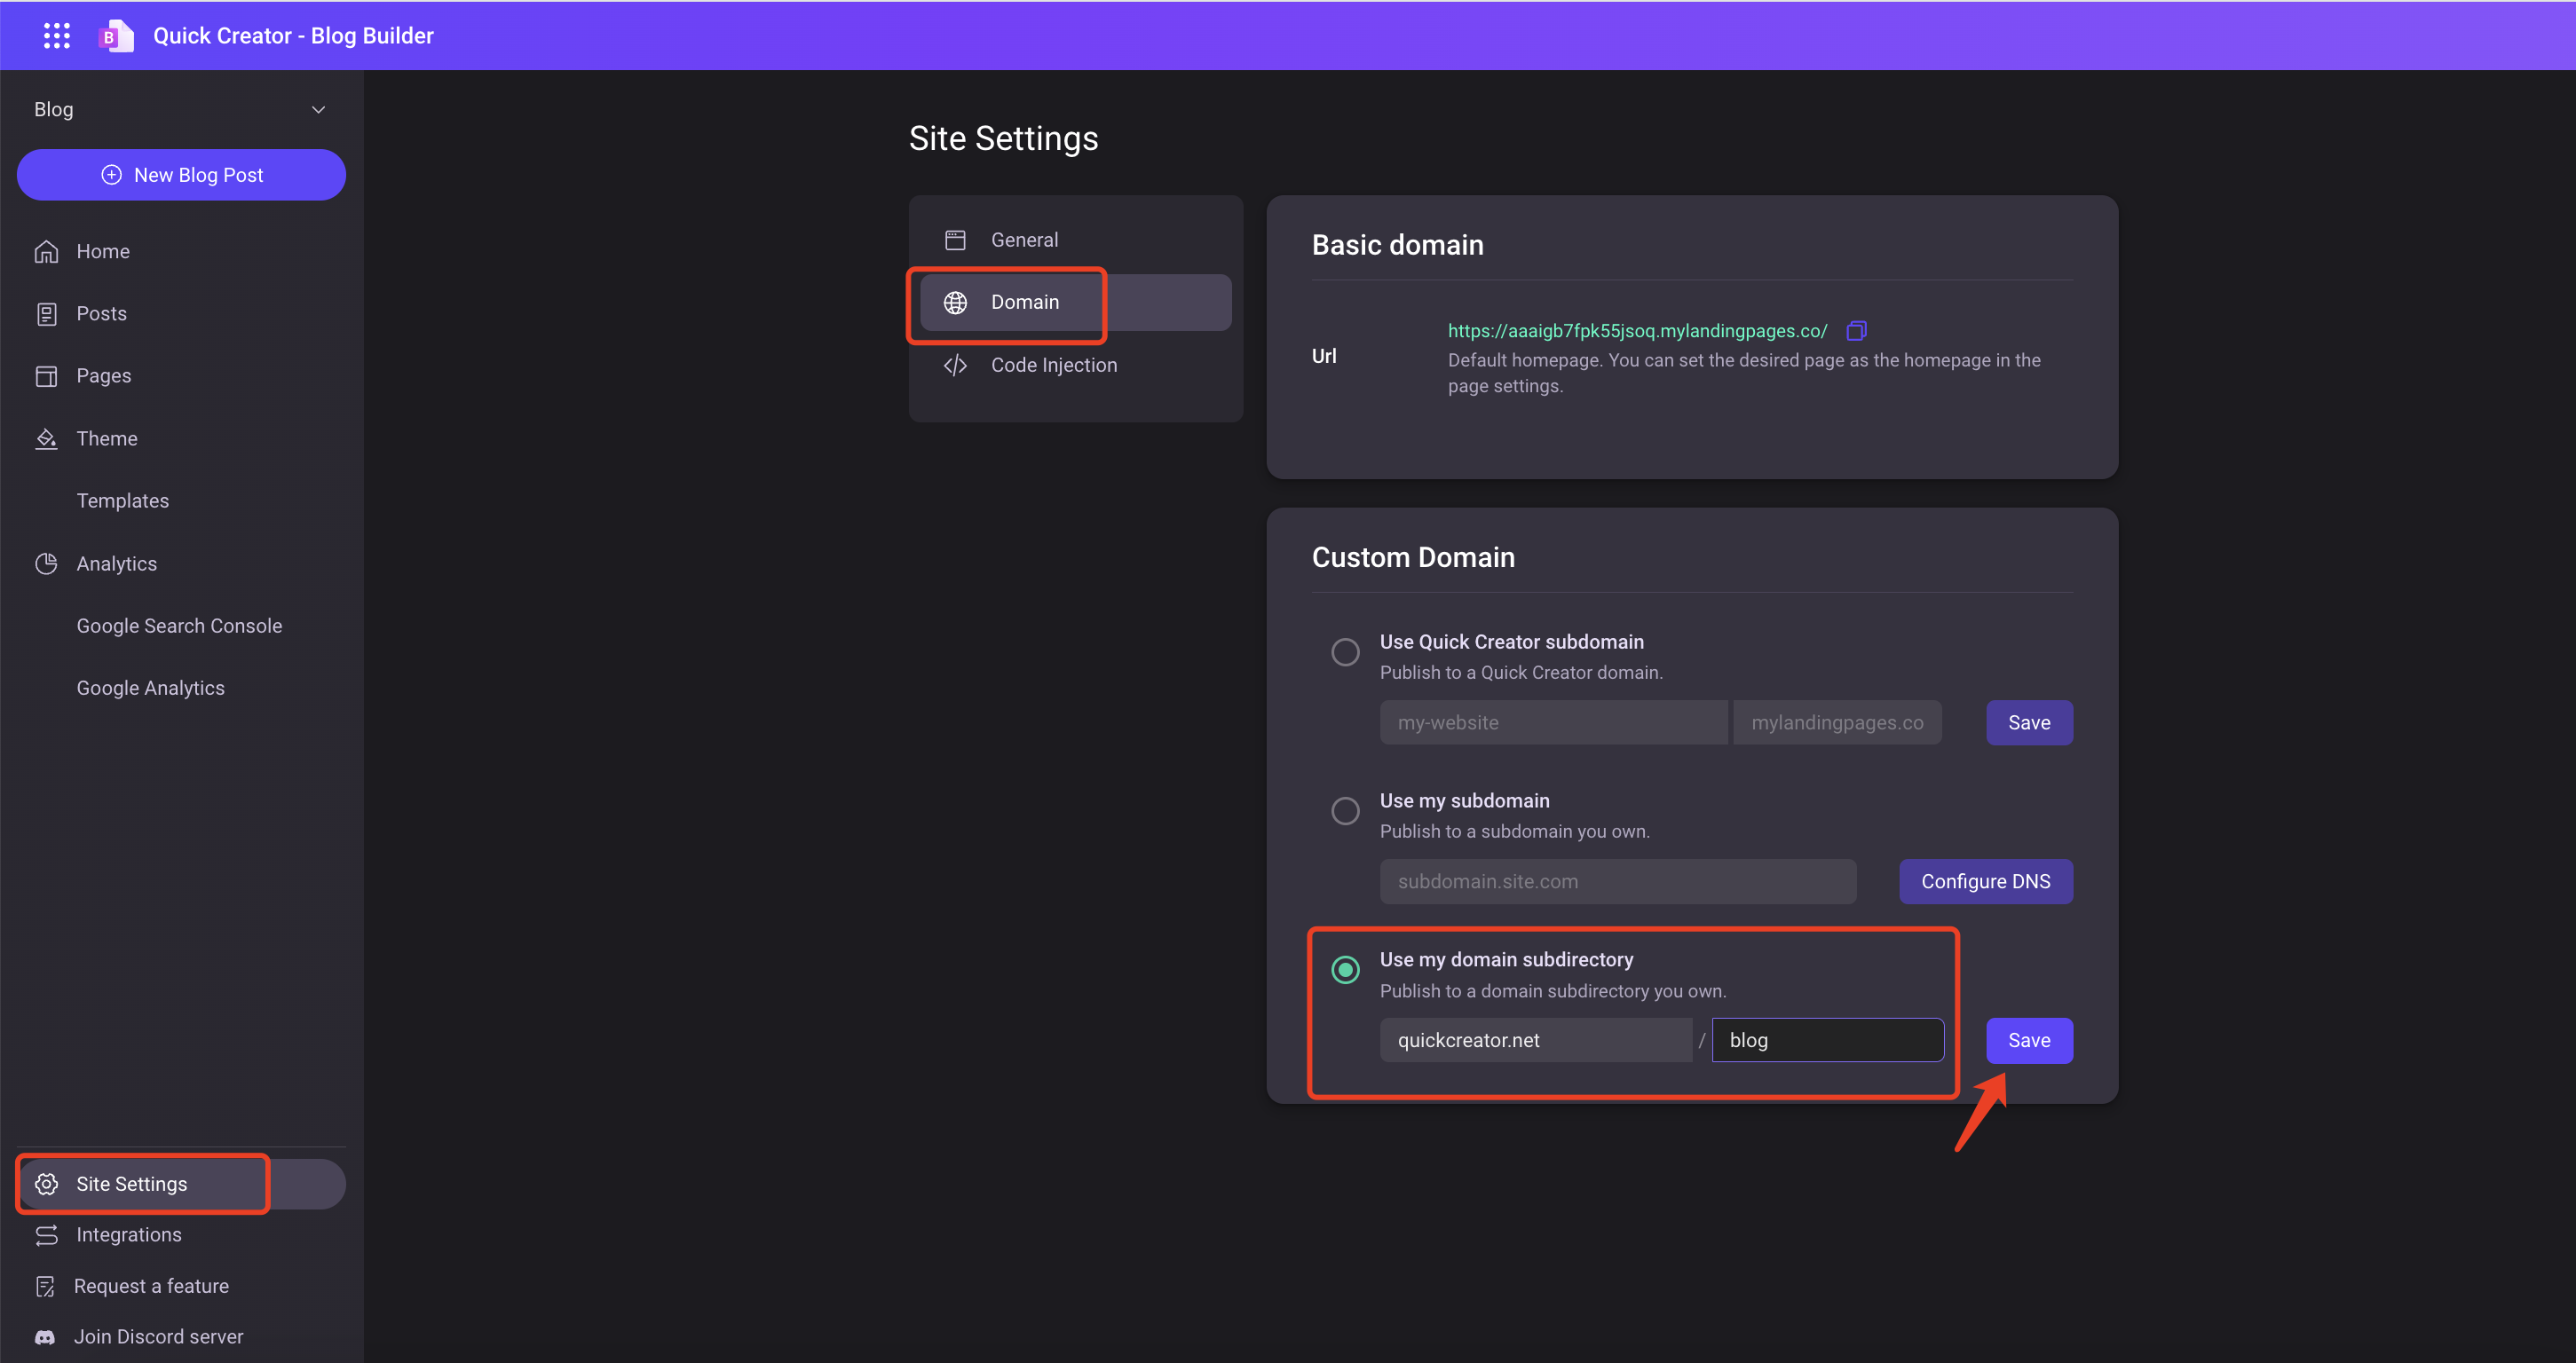
Click on 'Site Settings' and 'Domain', then select 'Use my domain subdirectory'. You can enter your domain name and subdirectory, like https://www.example.com/blog, and then click 'Save' to confirm your domain.
Next, the following configuration can be copied.
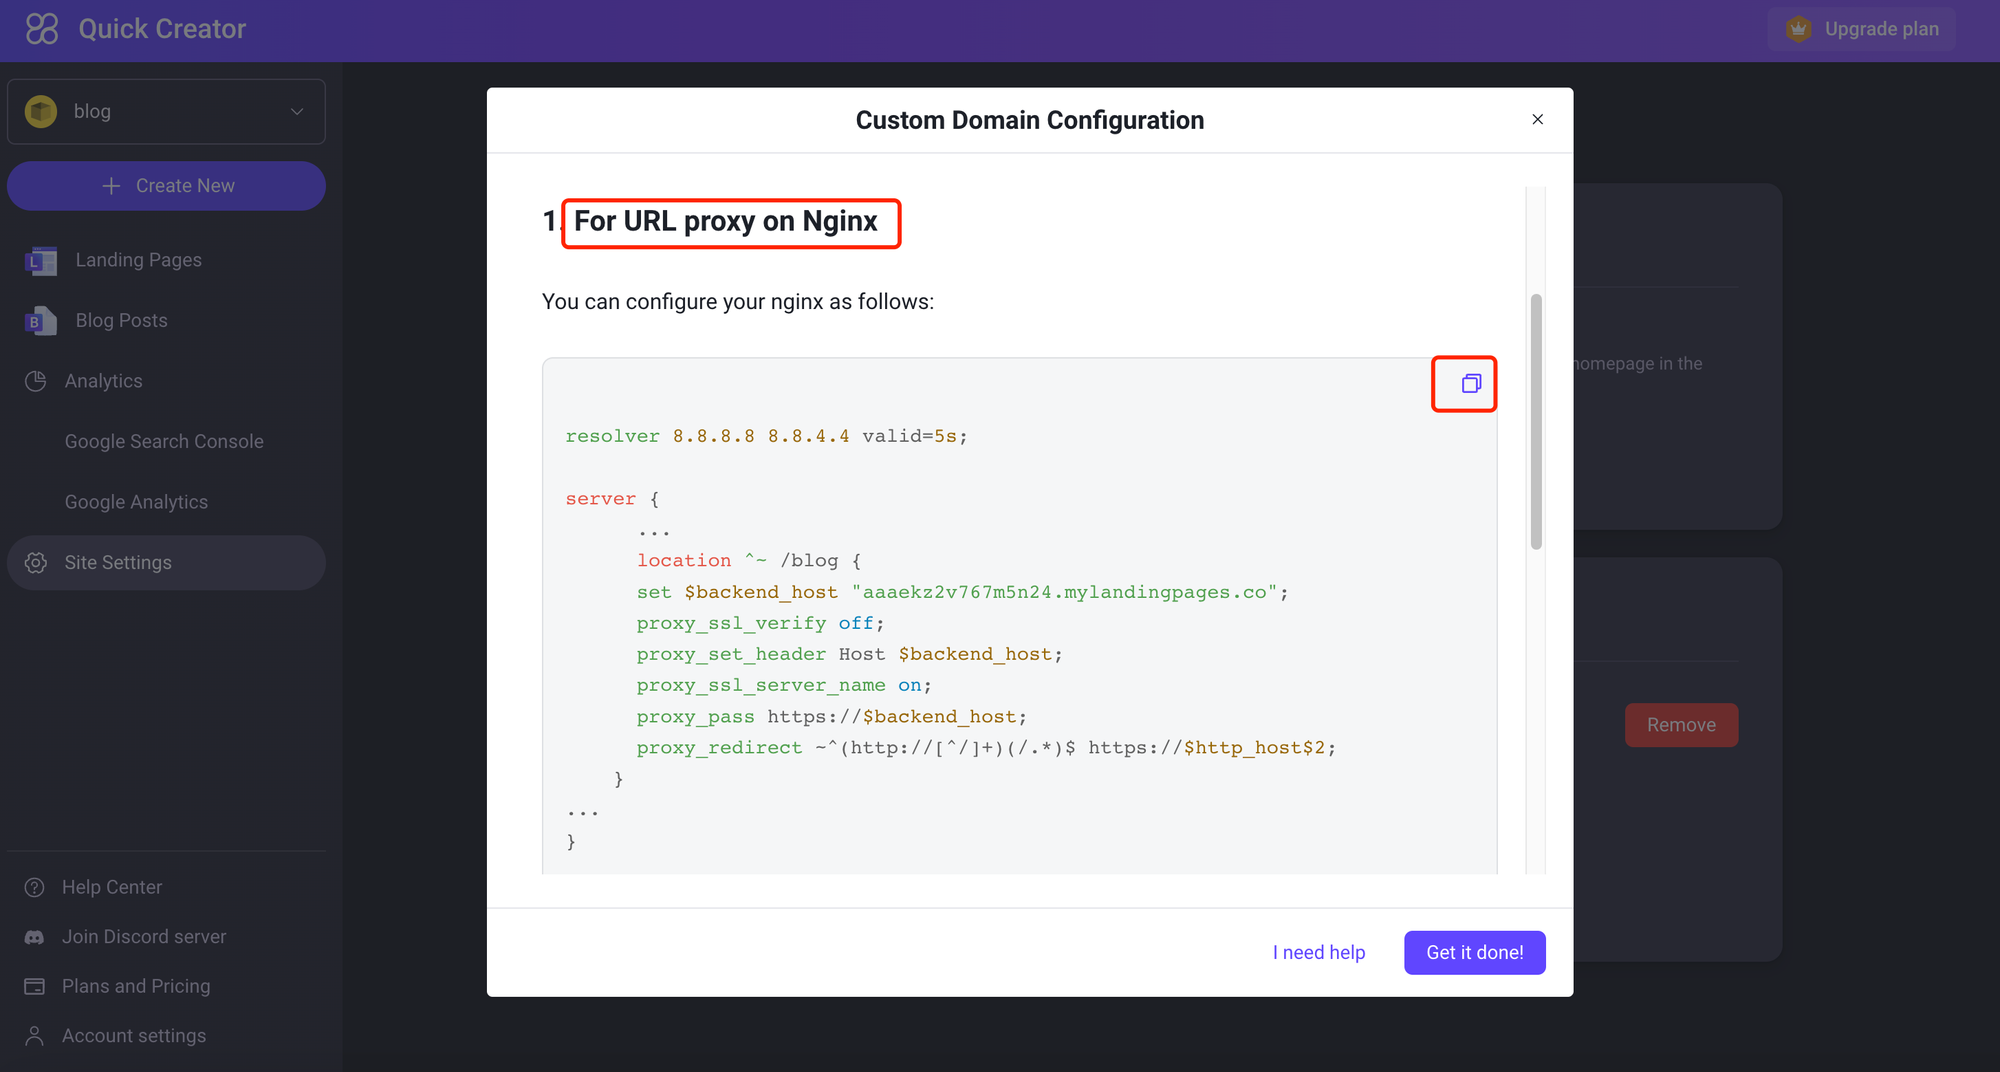
Config nginx.conf
To configure a reverse proxy with Nginx, you’ll need to create a location configuration file that includes SSL information and the location path details.
server {
    location ^~ /blog {
        set $backend_host "aaaekz2v767m5n24.mylandingpages.co";
        proxy_ssl_verify off;
        proxy_set_header Host $backend_host;
        proxy_ssl_server_name on;
        proxy_pass https://$backend_host;
        proxy_redirect ~^(http://[^/]+)(/.*)$ https://$http_host$2;
    }
}
URL Rewrites with IIS
The URL Rewrite module is available both as a download that you can install on your own IIS server, and on Microsoft's Azure Web Sites cloud platform. There are several best practices to keep in mind:
Config your domain Click on 'Site Settings' and 'Domain', then select 'Use my domain subdirectory '. You can enter your domain name and subdirectory, like www.example.com/blog, and then click 'Save' to confirm your domain.
Please copy the site URL
Add URL Rewrite rule(s)
Add rule
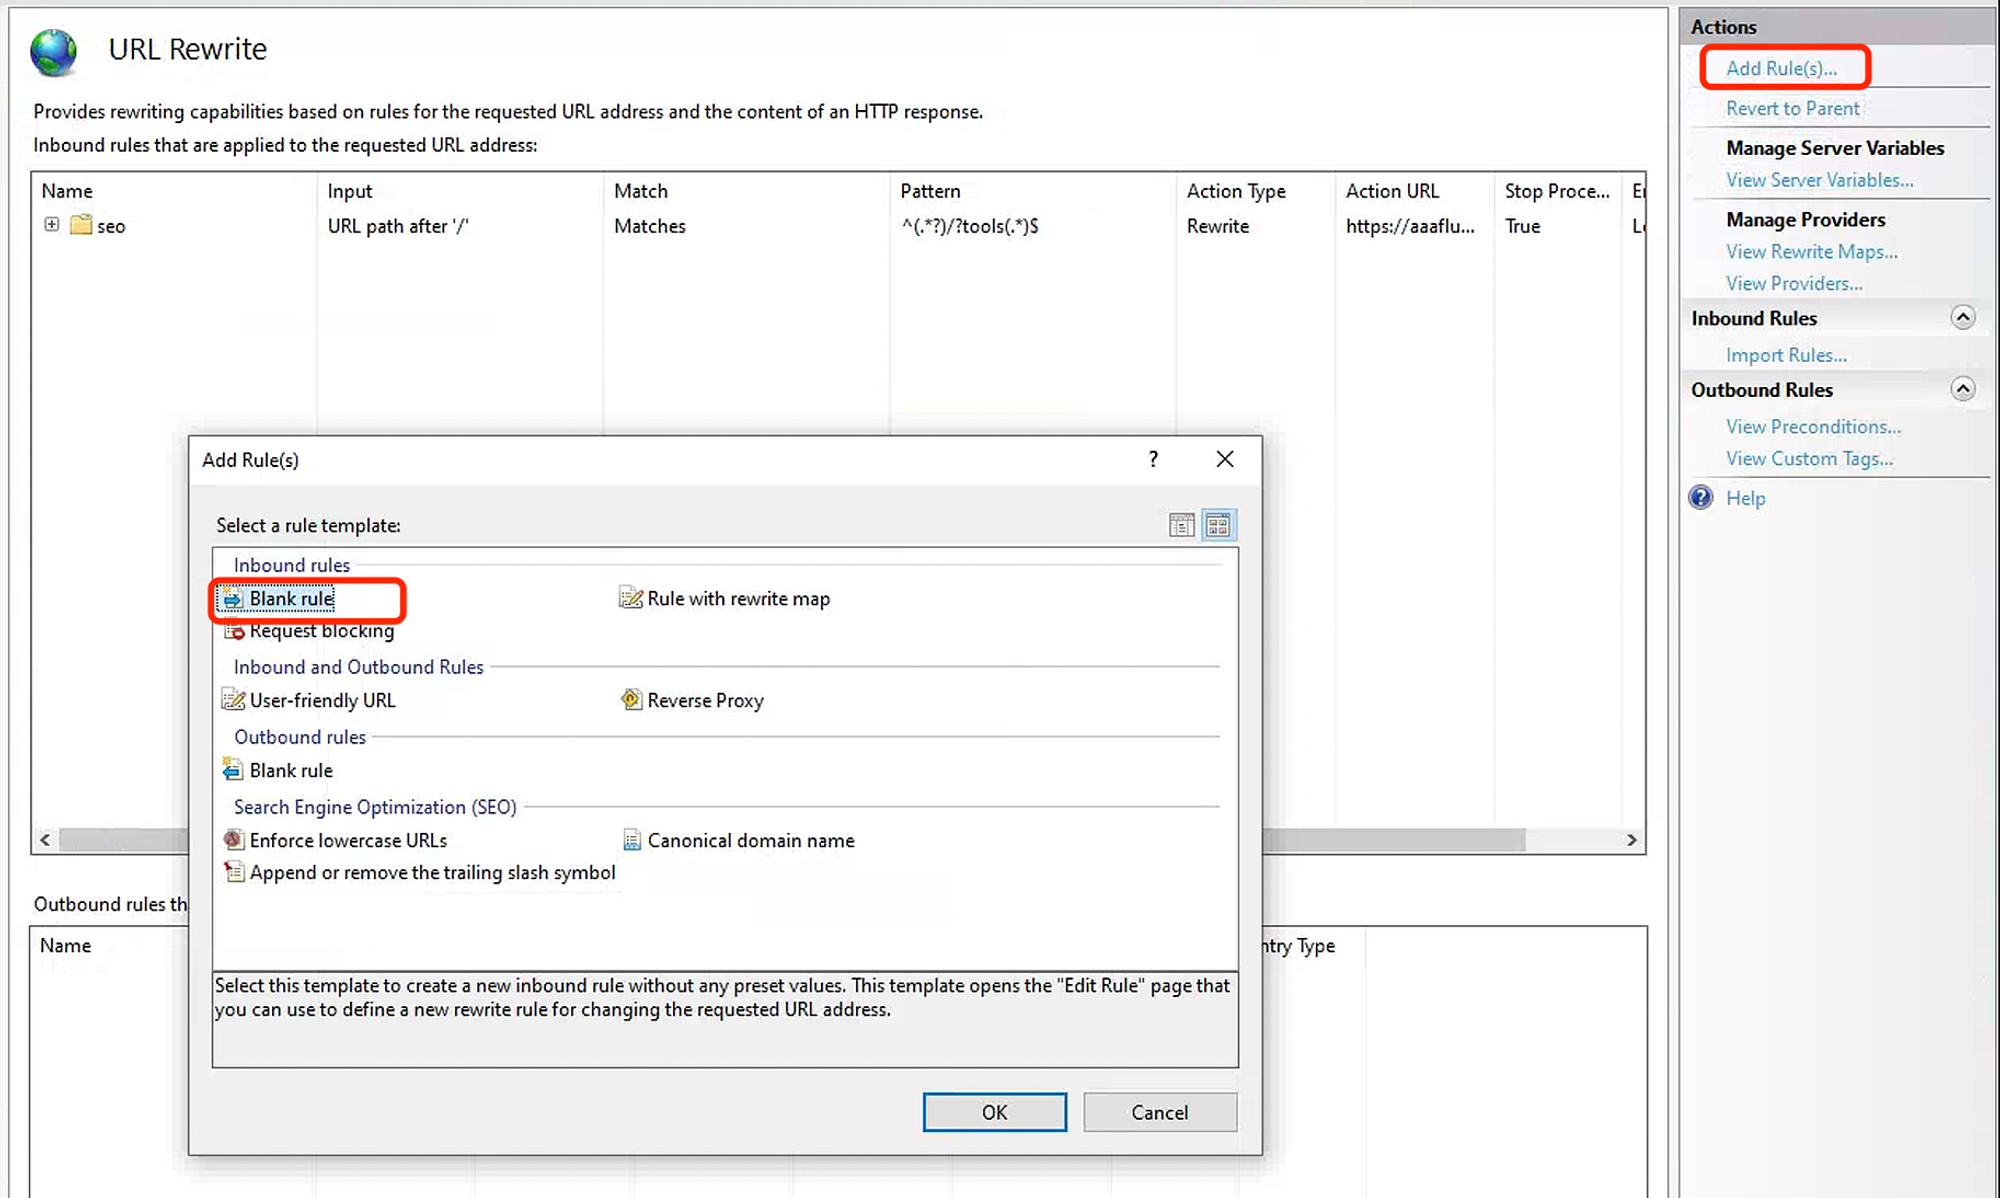
Go to IIS Manage, Select Your Web Site. In the Feature View click URL Rewrite. In the Actions pane on the right-hand side, click Add rules… In the Add Rules dialog box, select Blank Rule and click OK.
Naming a rule
In the Name text box, enter a name that will uniquely identify the rule, for example: "blog".
Defining a pattern
In the Pattern text box, enter the following string: "^(.?)/?blog(/.)?$"
Defining an action
Since the rule that we are creating is supposed to rewrite the URL, choose the Rewrite action type that is listed in the Action group box. In the Rewrite URL: text box, enter the following string: "https://aaaekz2v767m5n24.mylandingpages.co/{R:0}"
Notice that for the values of the query string parameters we used {R:0}, which represents the entire matched string from the pattern.
Leave default values for all other settings. The Edit Inbound Rule property page should look like the following page:
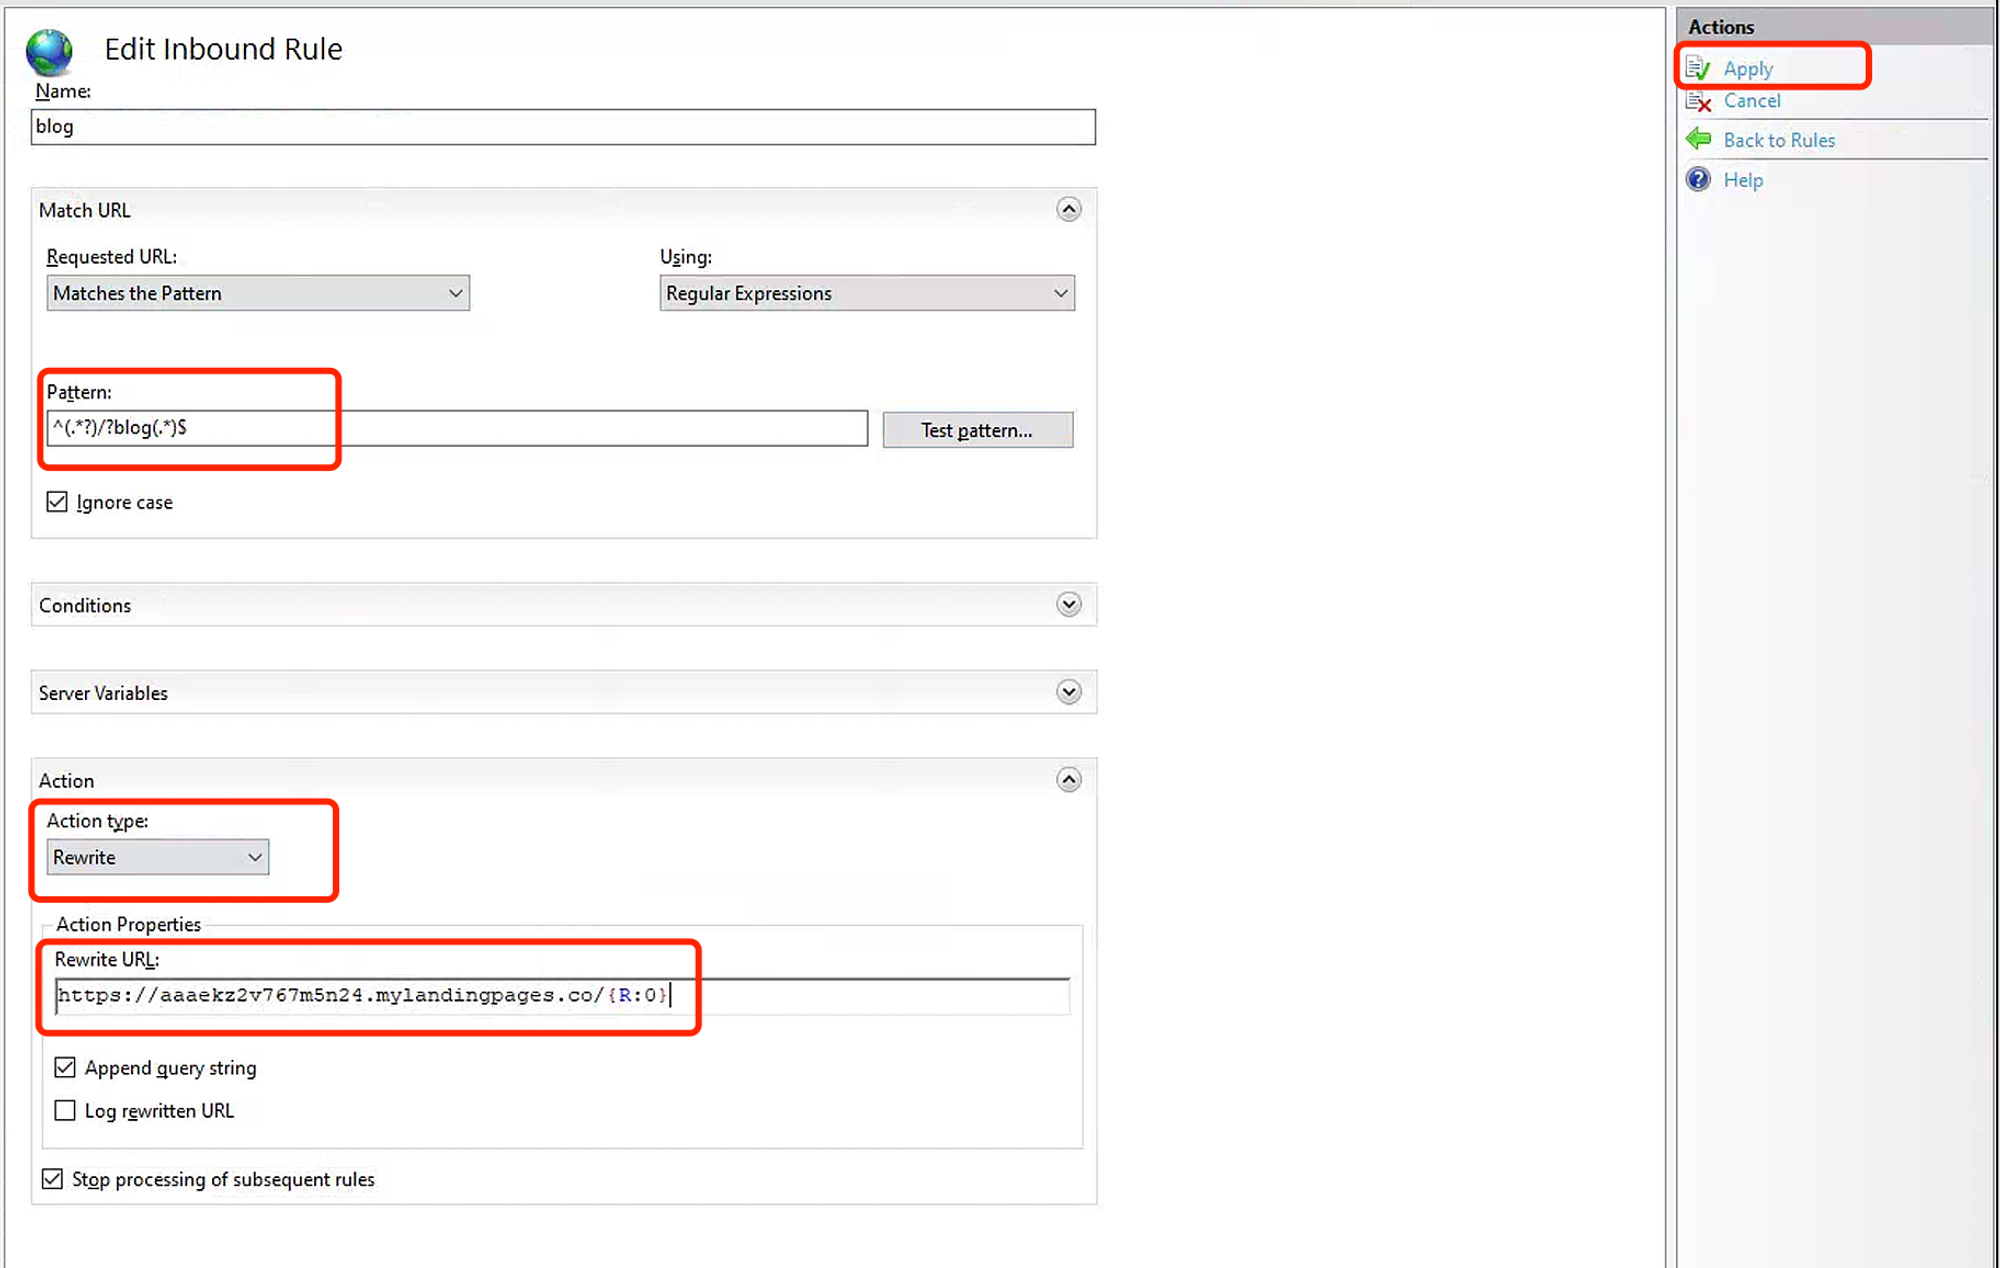
Save the rule by clicking Apply on the right-hand side.
URL Rewrites with Vercel
How do url rewrites work?
Rewrites are defined in a vercel.json file, which is located in the root of your application. For more information on all available properties, see the project configuration docs.
There are several best practices to keep in mind:
Config your domain
Click on 'Site Settings' and 'Domain', then select 'Use my domain subdirectory '.
You can enter your domain name and subdirectory, e.g. www.example.com/blog, and then click 'Save' to confirm your domain.
Please copy the site URL to proceed.
Config Rewrites on Vercel
Here's an example of a vercel.json file that rewrites to an external destination:
{
  "rewrites": [
      {
         "source": "/blog/:slug*",
         "destination": "https://aaaekz2v767m5n24.mylandingpages.co/blog/:slug*"
      }
  ]
}
In this example, source defines the incoming path pattern to match, and destination defines the URL to rewrite to. The :slug* syntax is a wildcard that captures any path after /blog/ and passes it to the destination URL.
URL proxying with Apache
Using Apache as a Reverse Proxy
Now, it's time to configure Apache reverse proxy to accept requests from the internet and forward them to QuickCreator's service. There are several best practices to keep in mind:
Config your domain
Click on 'Site Settings' and 'Domain', then select 'Use my domain subdirectory '. You can enter your domain name and subdirectory, like www.example.com/blog, and then click 'Save' to confirm your domain.
Next, the following configuration can be copied.

Config ssl.conf
Edit your ssl.conf file and paste in what you copied above as follows:
SSLProxyEngine on
SSLProxyVerify off
SSLProxyCheckPeerName off
ProxyPass /blog aaaekz2v767m5n24.mylandingpage
ProxyPassReverse /blog aaaekz2v767m5n24.mylandingpage
URL Rewrites with NEXT.JS
Middleware
Middleware allows you to run code before a request is completed. Then, based on the incoming request, you can modify the response by rewriting, redirecting, modifying the request or response headers, or responding directly.
Middleware runs before cached content and routes are matched. See Matching Paths for more details.
Example
Use the file middleware.ts (or .js) in the root of your project to define Middleware. For example, at the same level as pages or app, or inside src if applicable.
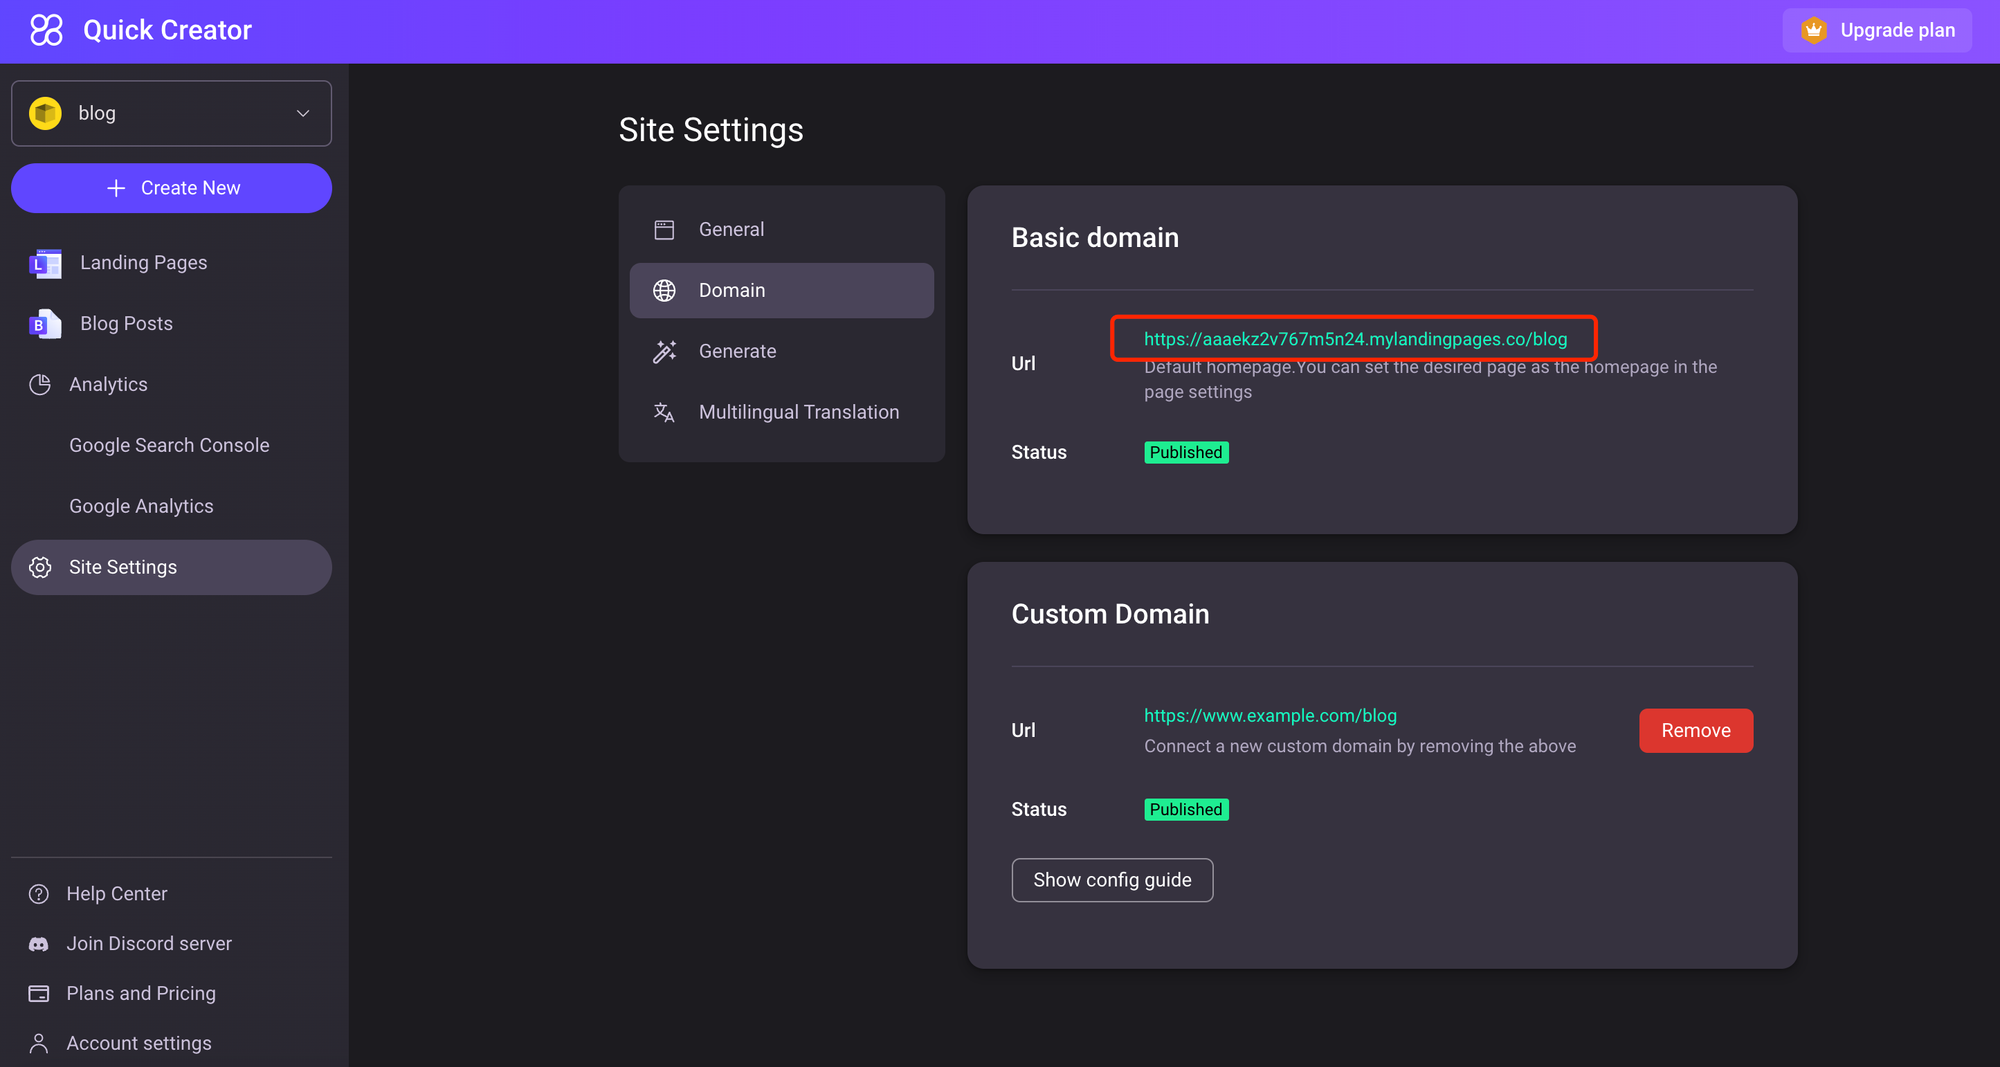
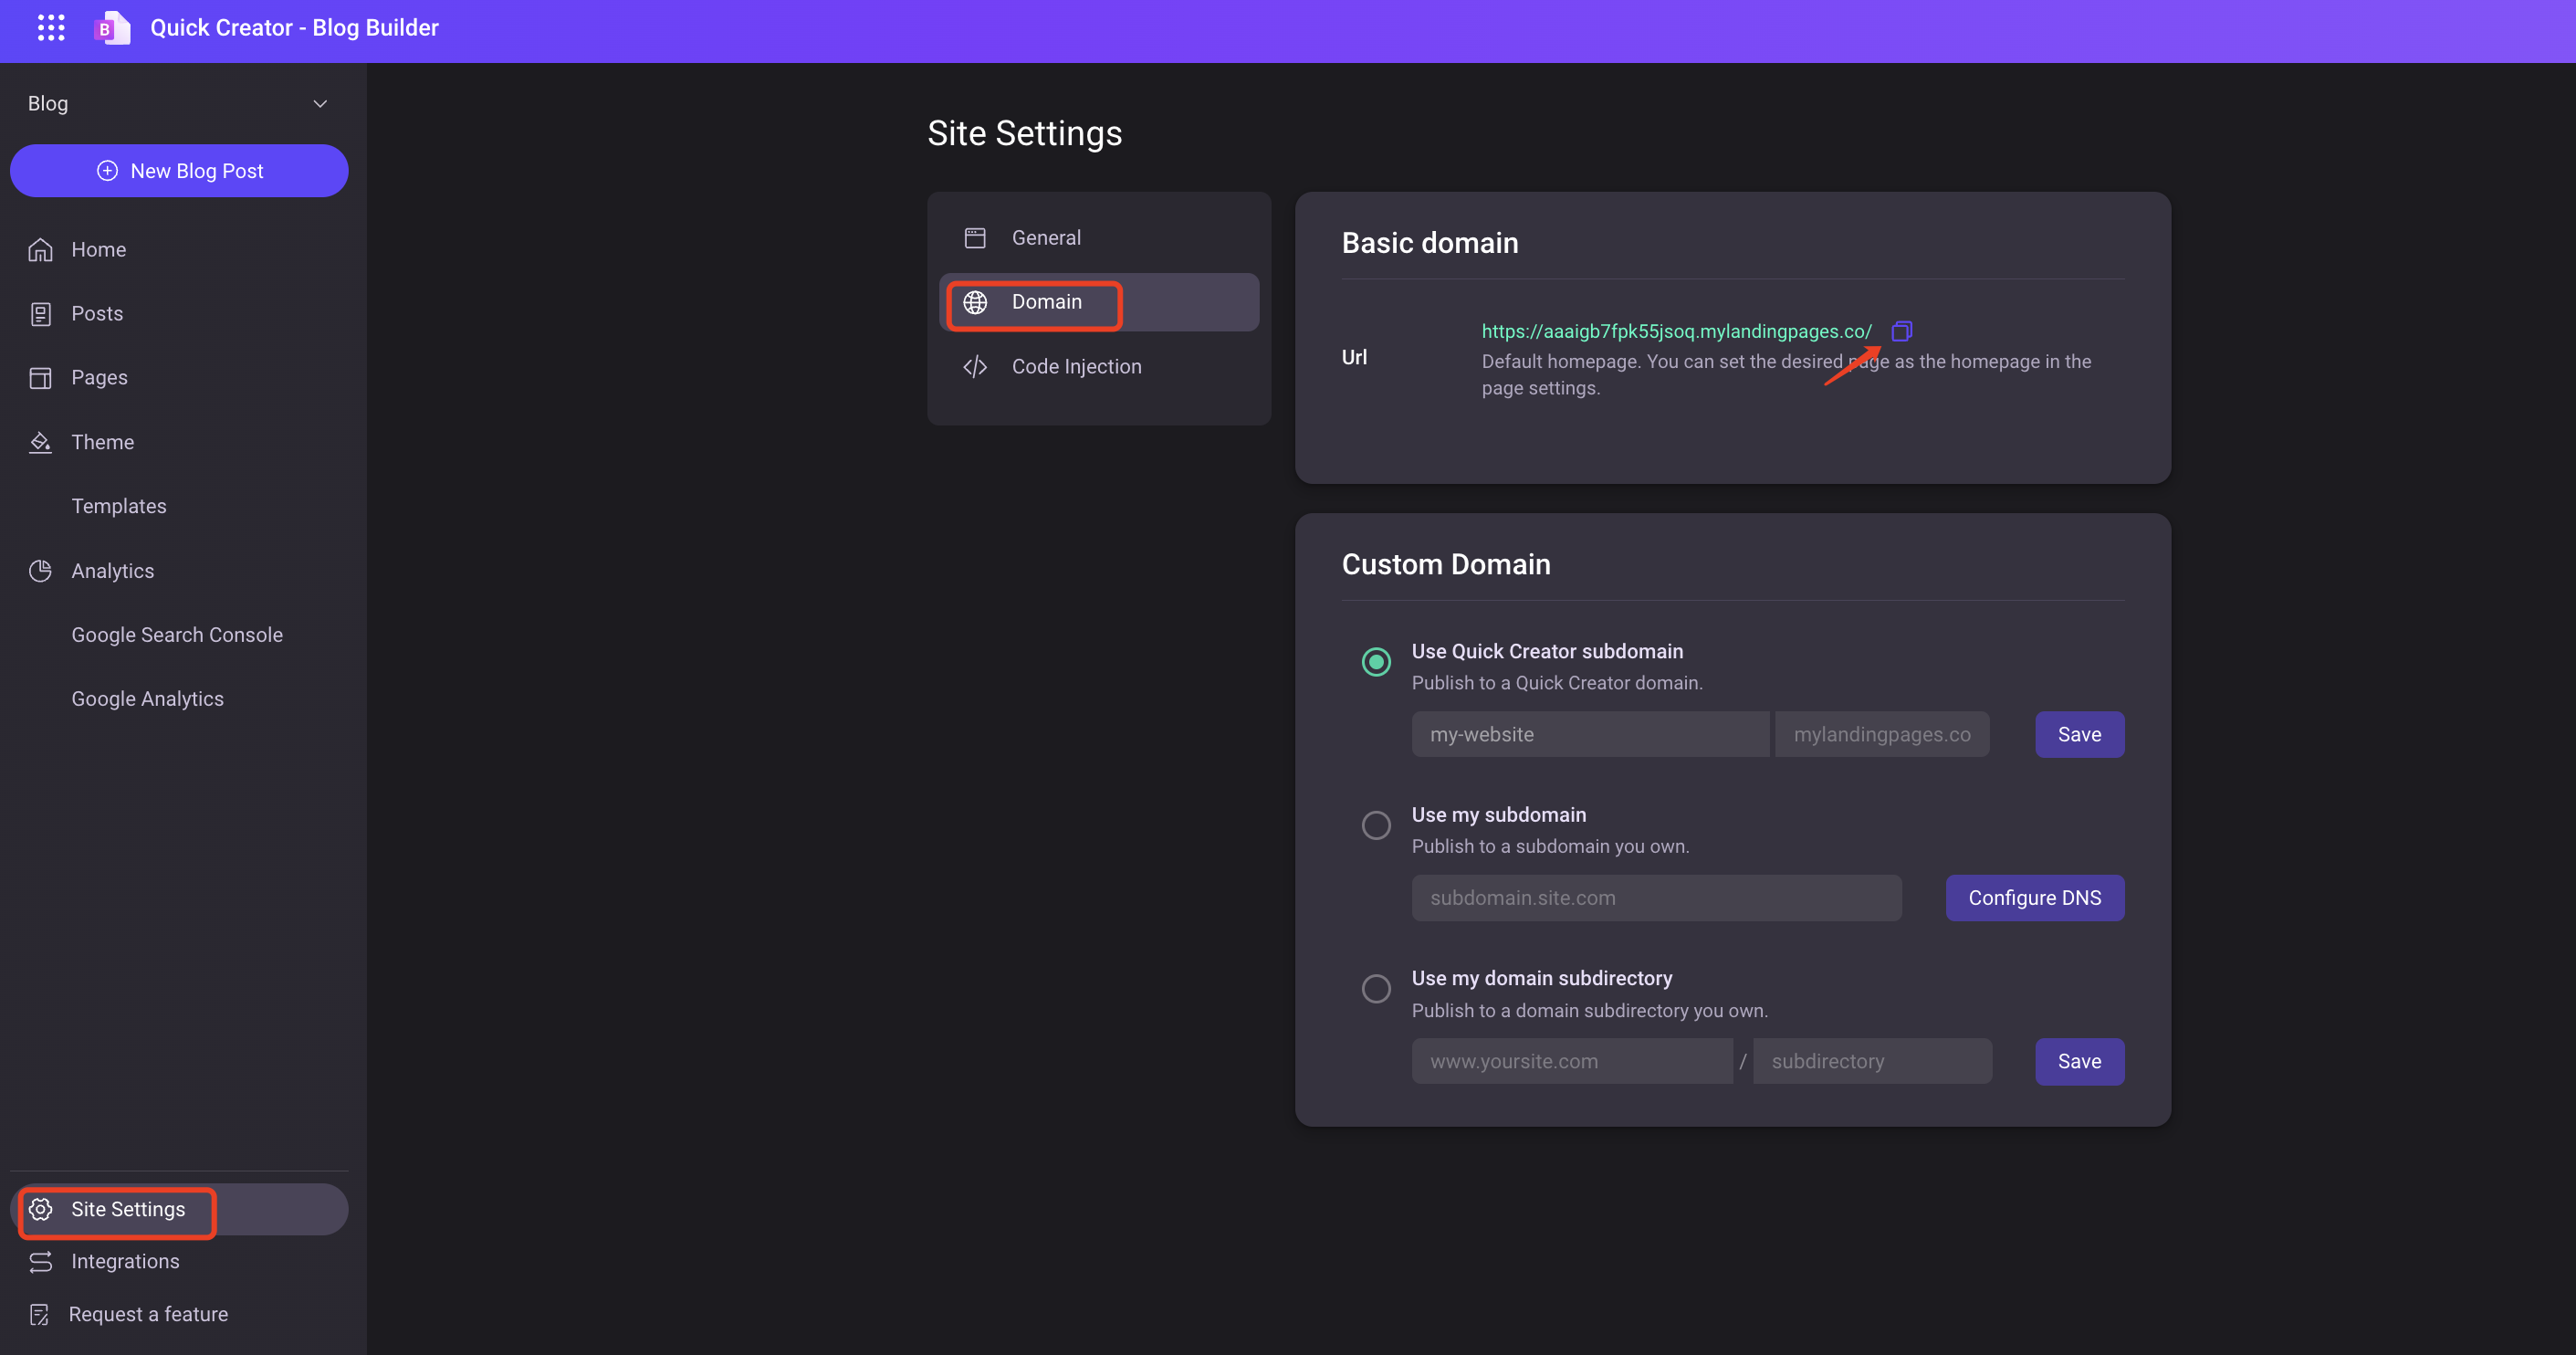
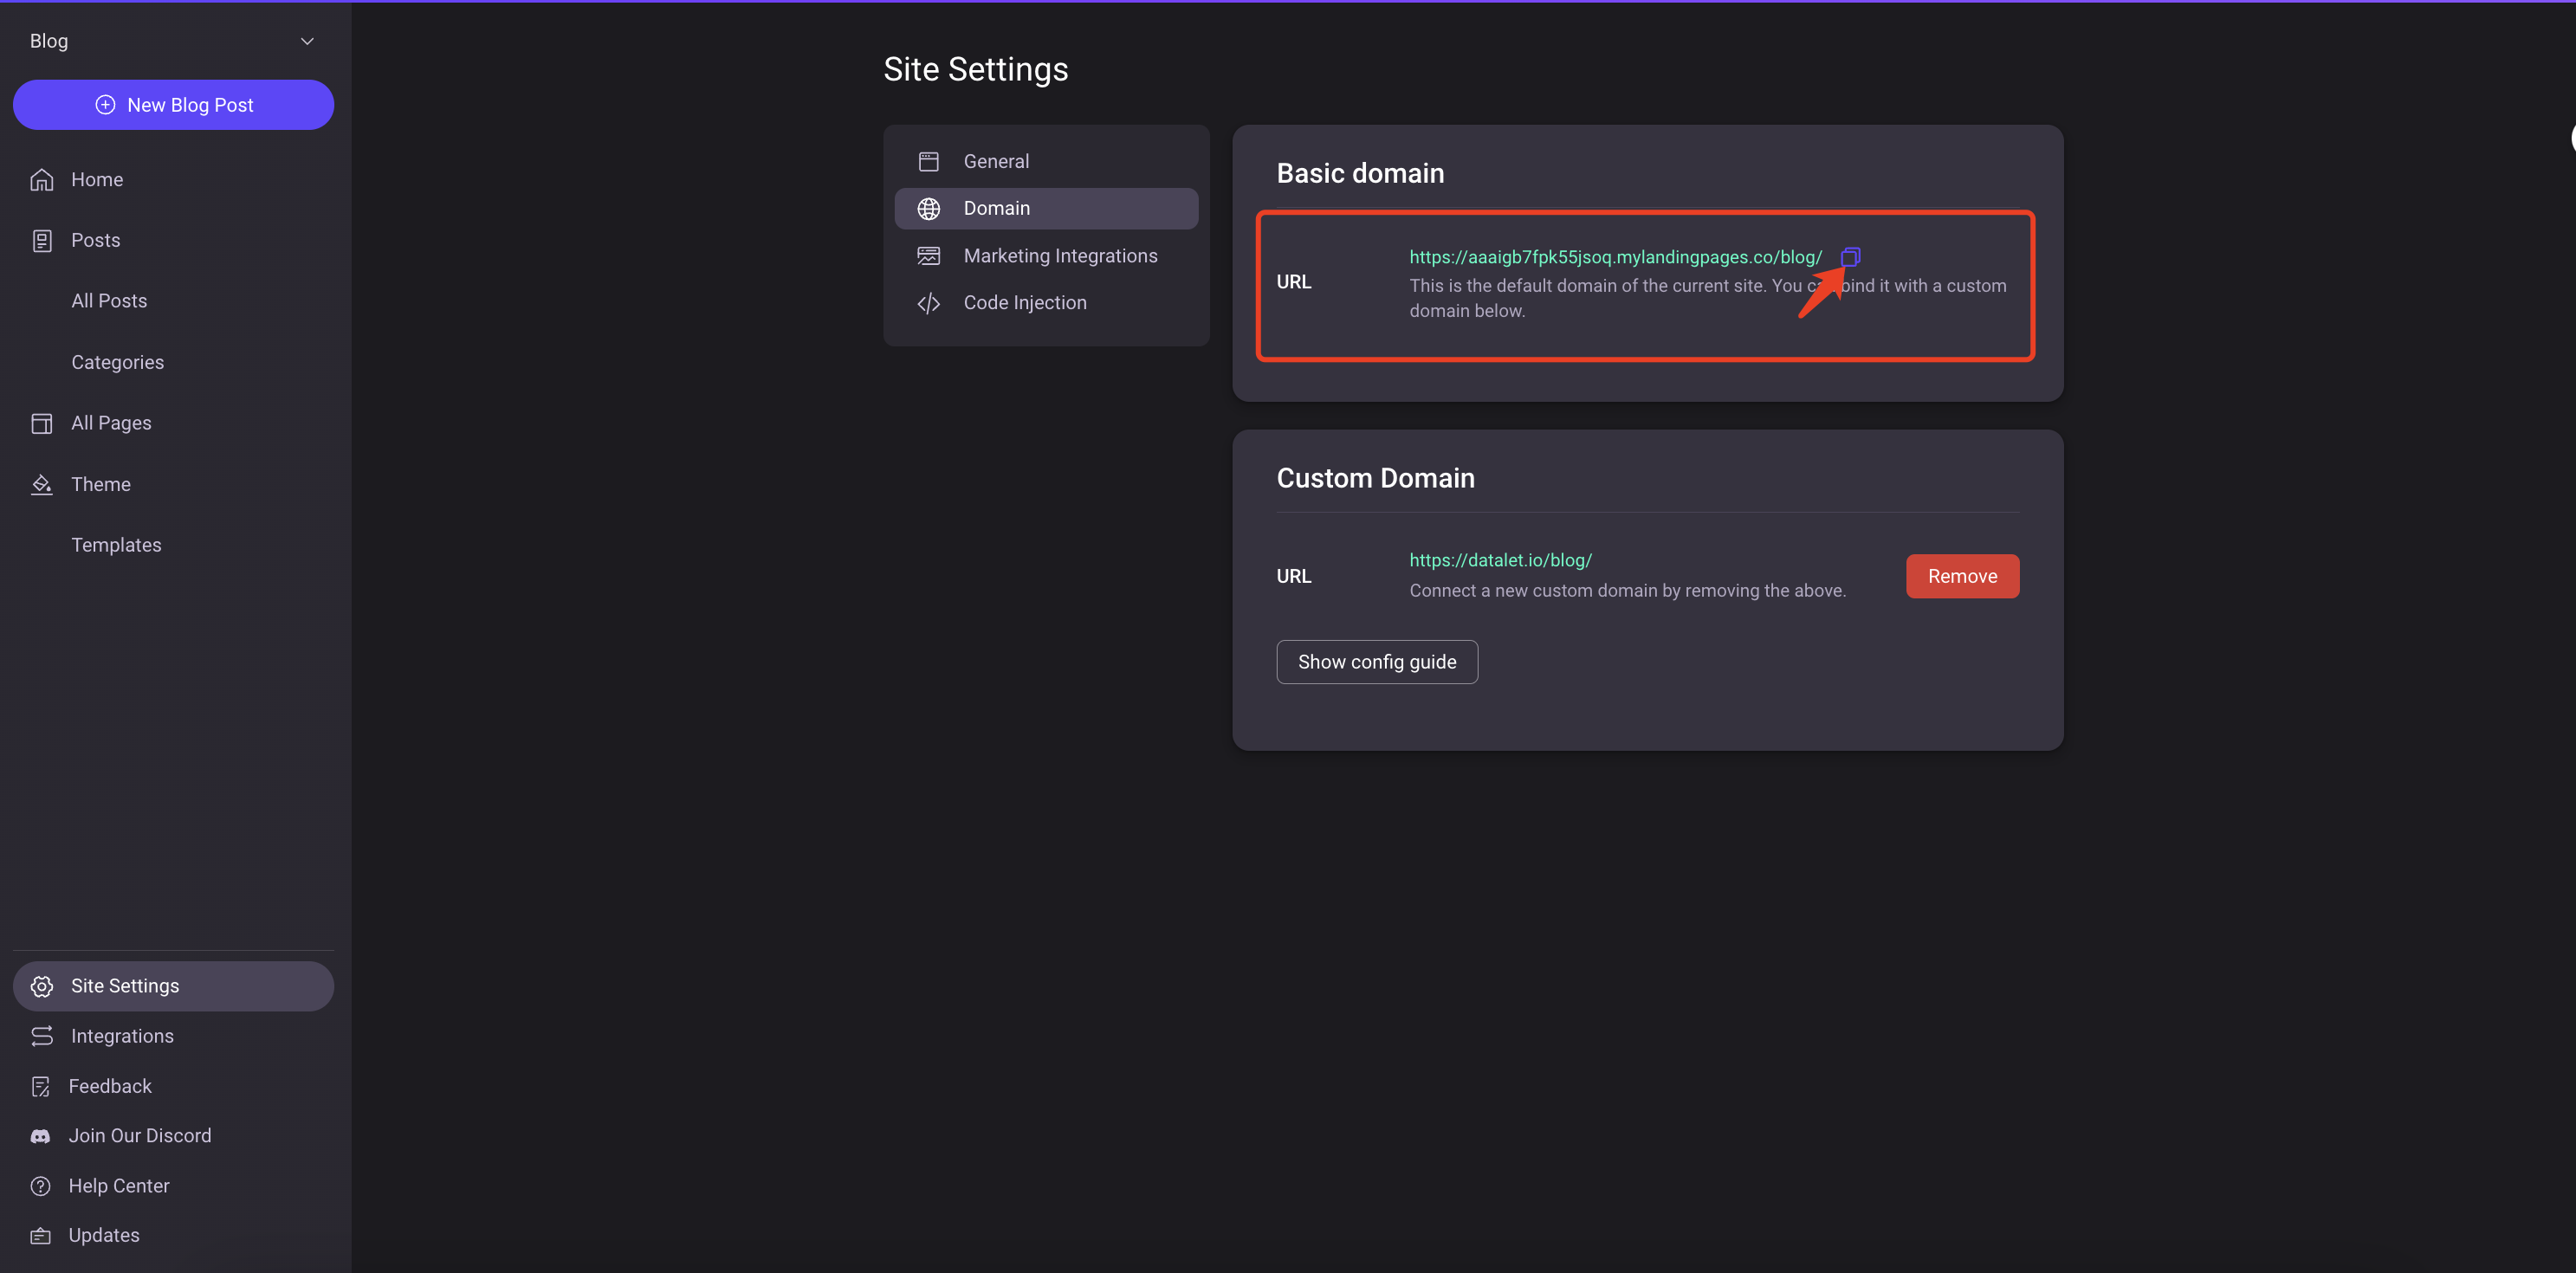
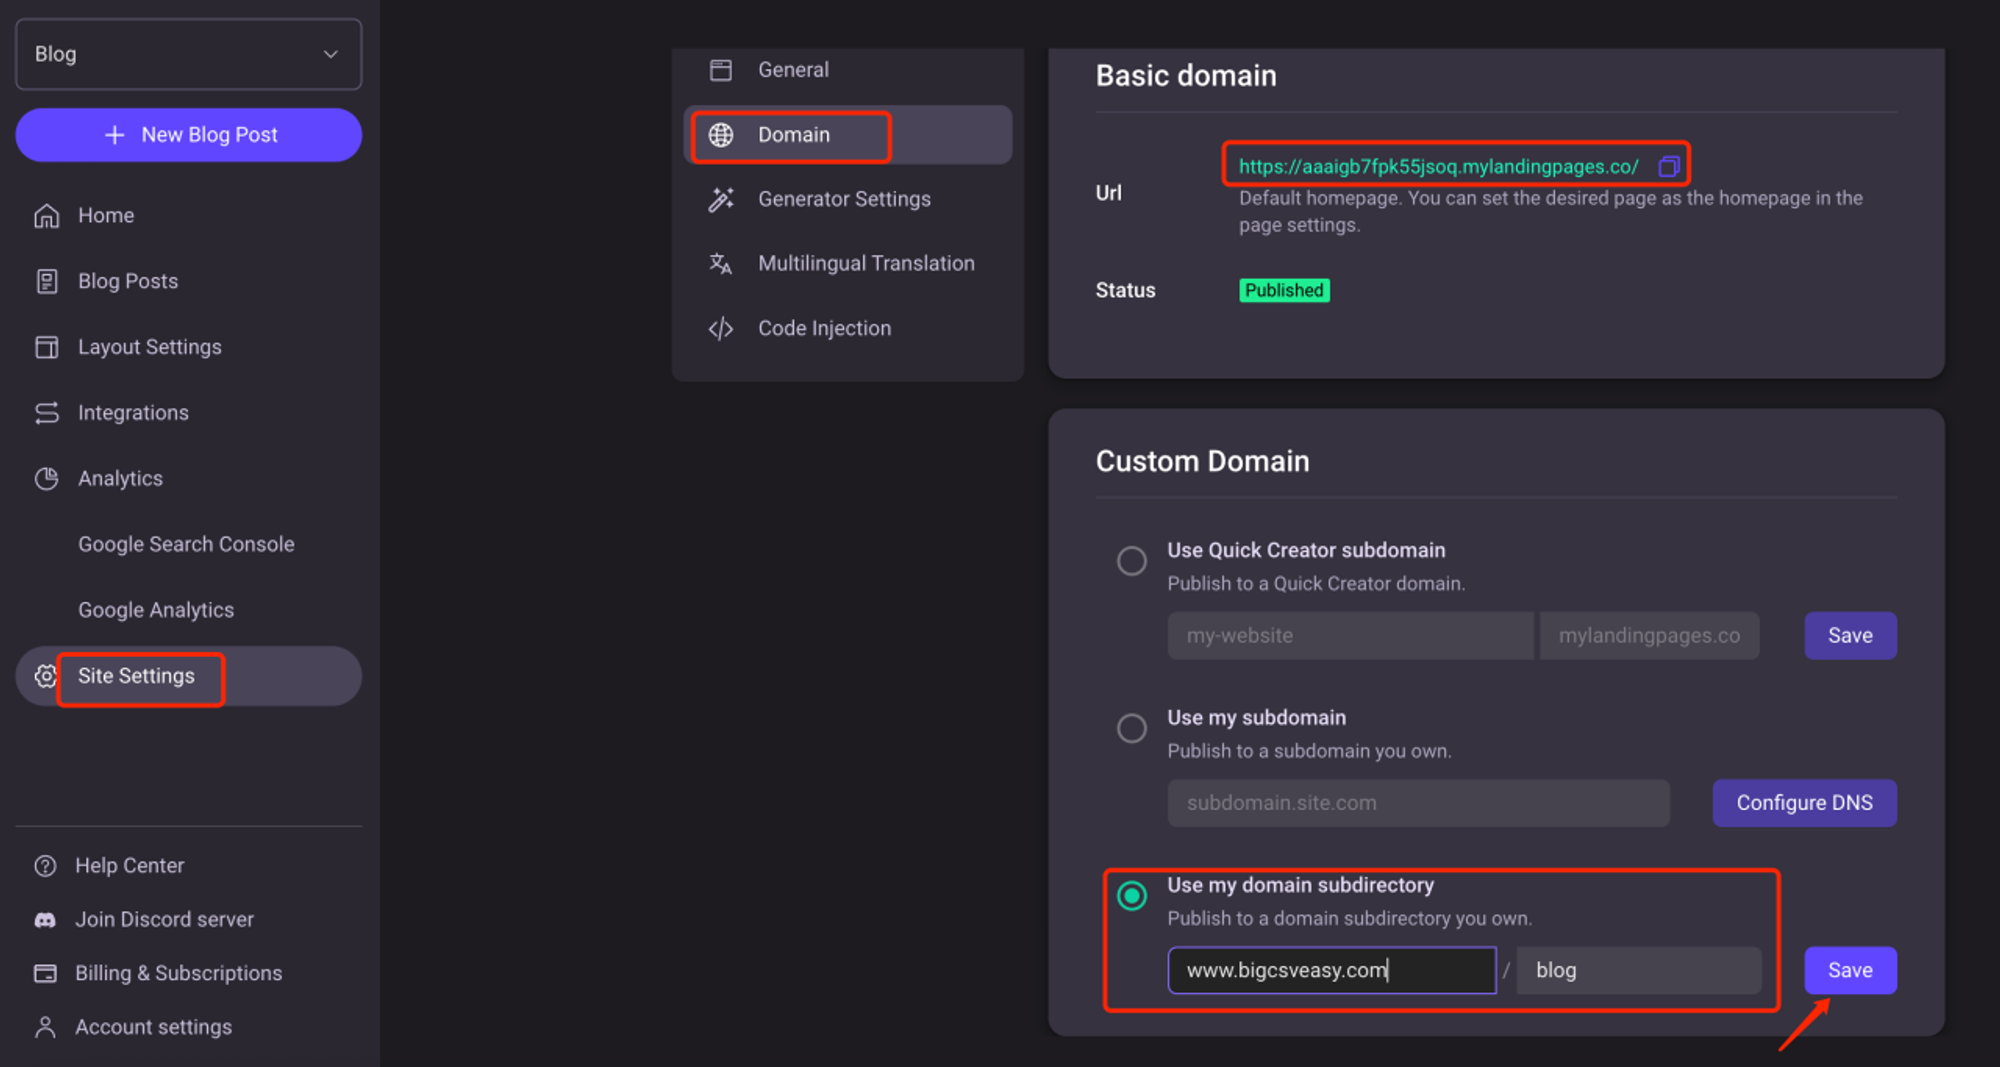
Step number one - copy basic url Click on Site Settings -> Domain , click to copy the basic domain URL.
Step number two - bind domain name
Click on Site Settings -> Domain, select Use my domain subdirectory You can enter your domain name and subdirectory, e.g. mydomain/blog, and then click Save to confirm your domain.
Step number three - add rewrite conditional statement
Add the following configuration to middleware.ts
startWith: /blog - the path you expect, e.g. https://mydomain/blog
targetBaseUrl: Use the URL copied in step number one
import { NextResponse } from 'next/server';
import type { NextRequest } from 'next/server';

export function middleware(request: NextRequest) {
  if (request.nextUrl.pathname.startsWith('/blog')) {
    const targetBaseUrl = 'https://aaaigb7fpk55jsoq.mylandingpages.co';
    const targetUrl = new URL(targetBaseUrl + request.nextUrl.pathname);
    return NextResponse.rewrite(targetUrl);
  }
  return NextResponse.next();
}
URL Rewrites with Netlify
First, bind the domain and path using "Use my domain subdirectory," then copy the Basic domain URL.
Second, In the root directory of your frontend codebase, locate the netlify.toml file and add the following content:
from = "/blog/*" # The defined /blog path
to = "Copied Basic domain URL from the previous step/:splat" # Note the addition of :splat
[[redirects]]
  from = "/blog/*"
  to = "https://aaaigb7fpk55jsoq.mylandingpages.co/blog/:splat"
  status = 200
  force = true
Cloudflare Workers Routes Point to QuickCreator
If your DNS resolution is Cloudflare and you have access to a Cloudflare DNS proxy, the following can be implemented using the Cloudflare worker route to the QuickCreator domain. Start the Cloudflare DNS proxy

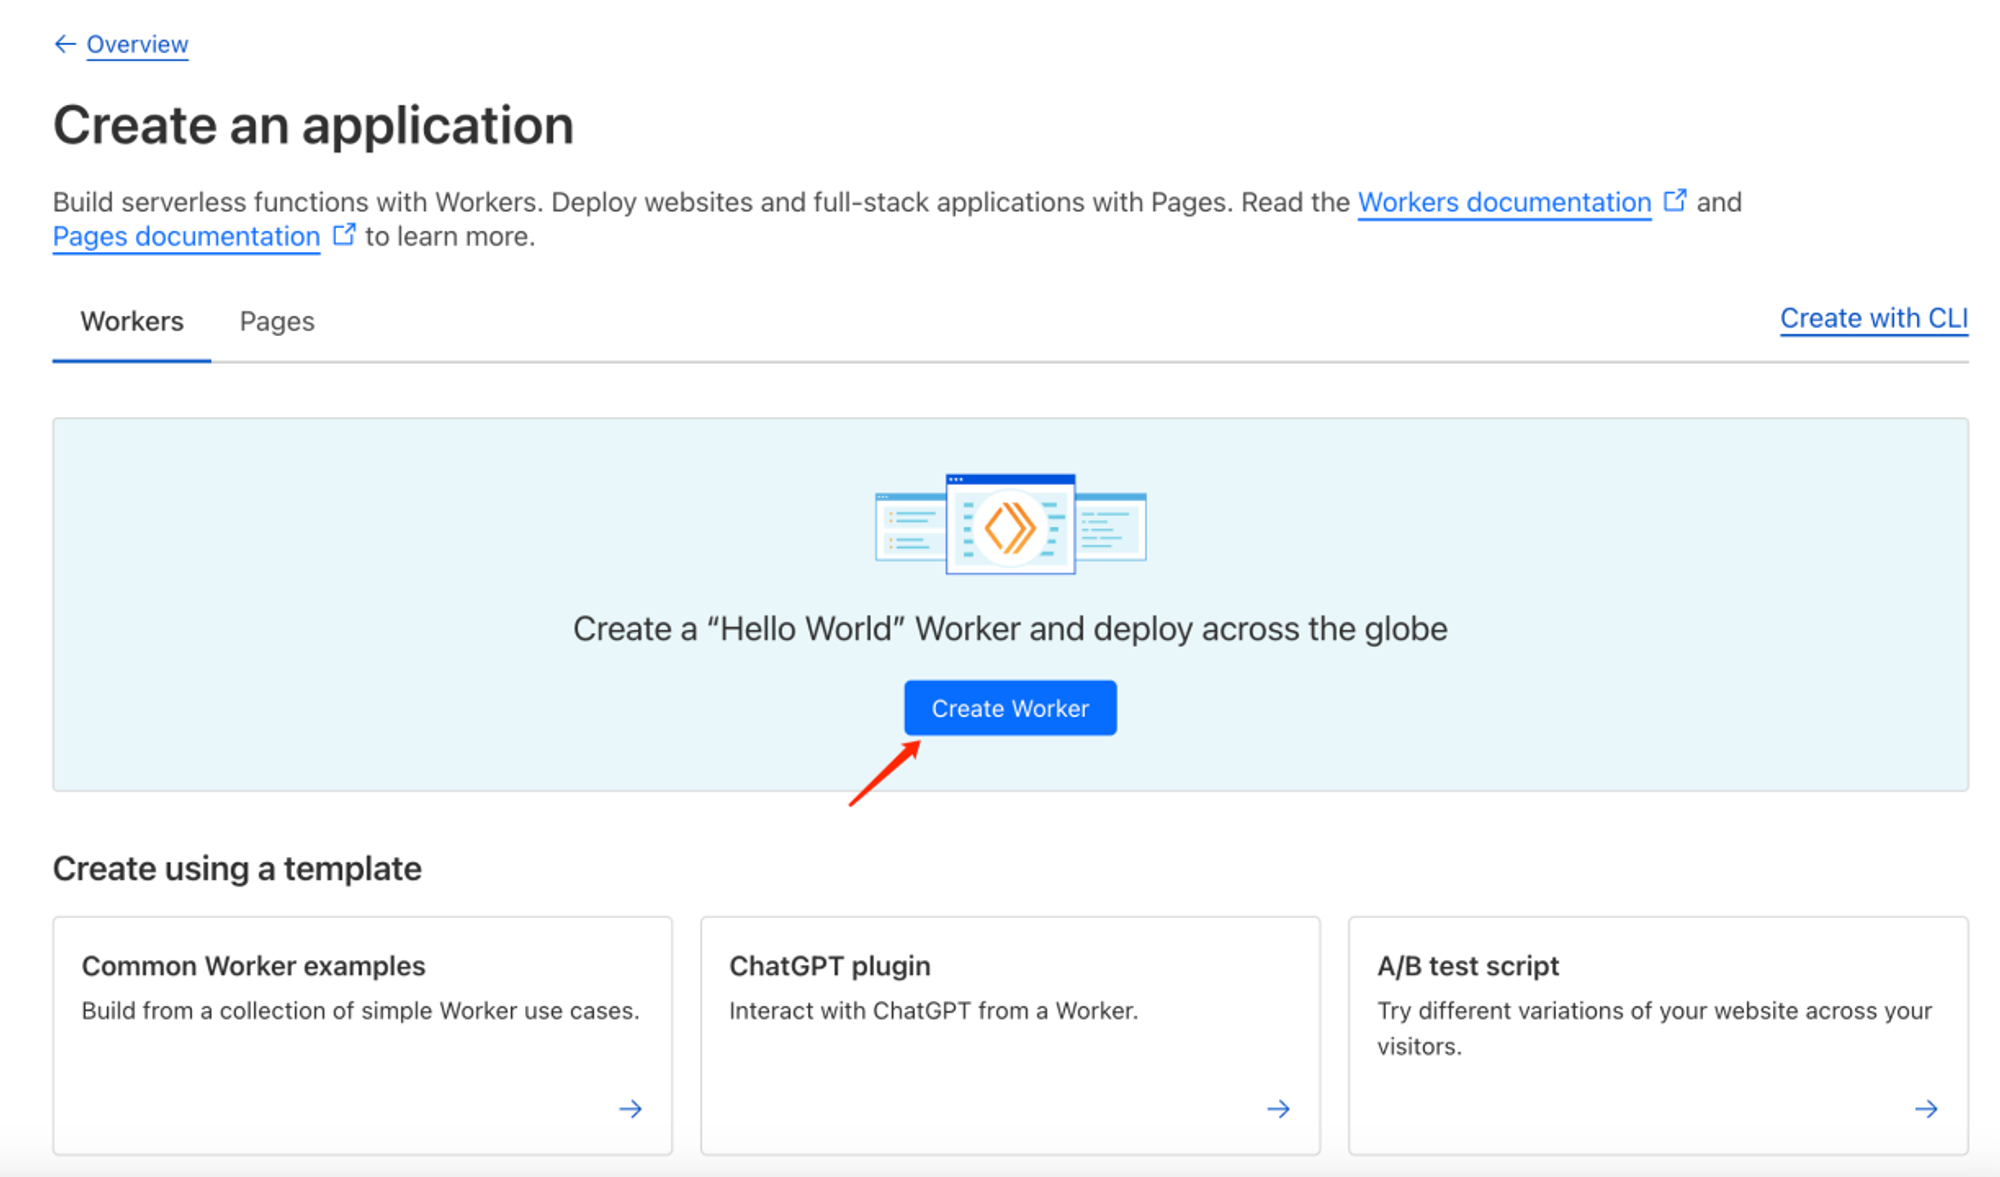
Create Application and Worker
Click Workers and Pages -> Create Application Click Create worker
Enter a Name, e.g. blog, and click Deploy.
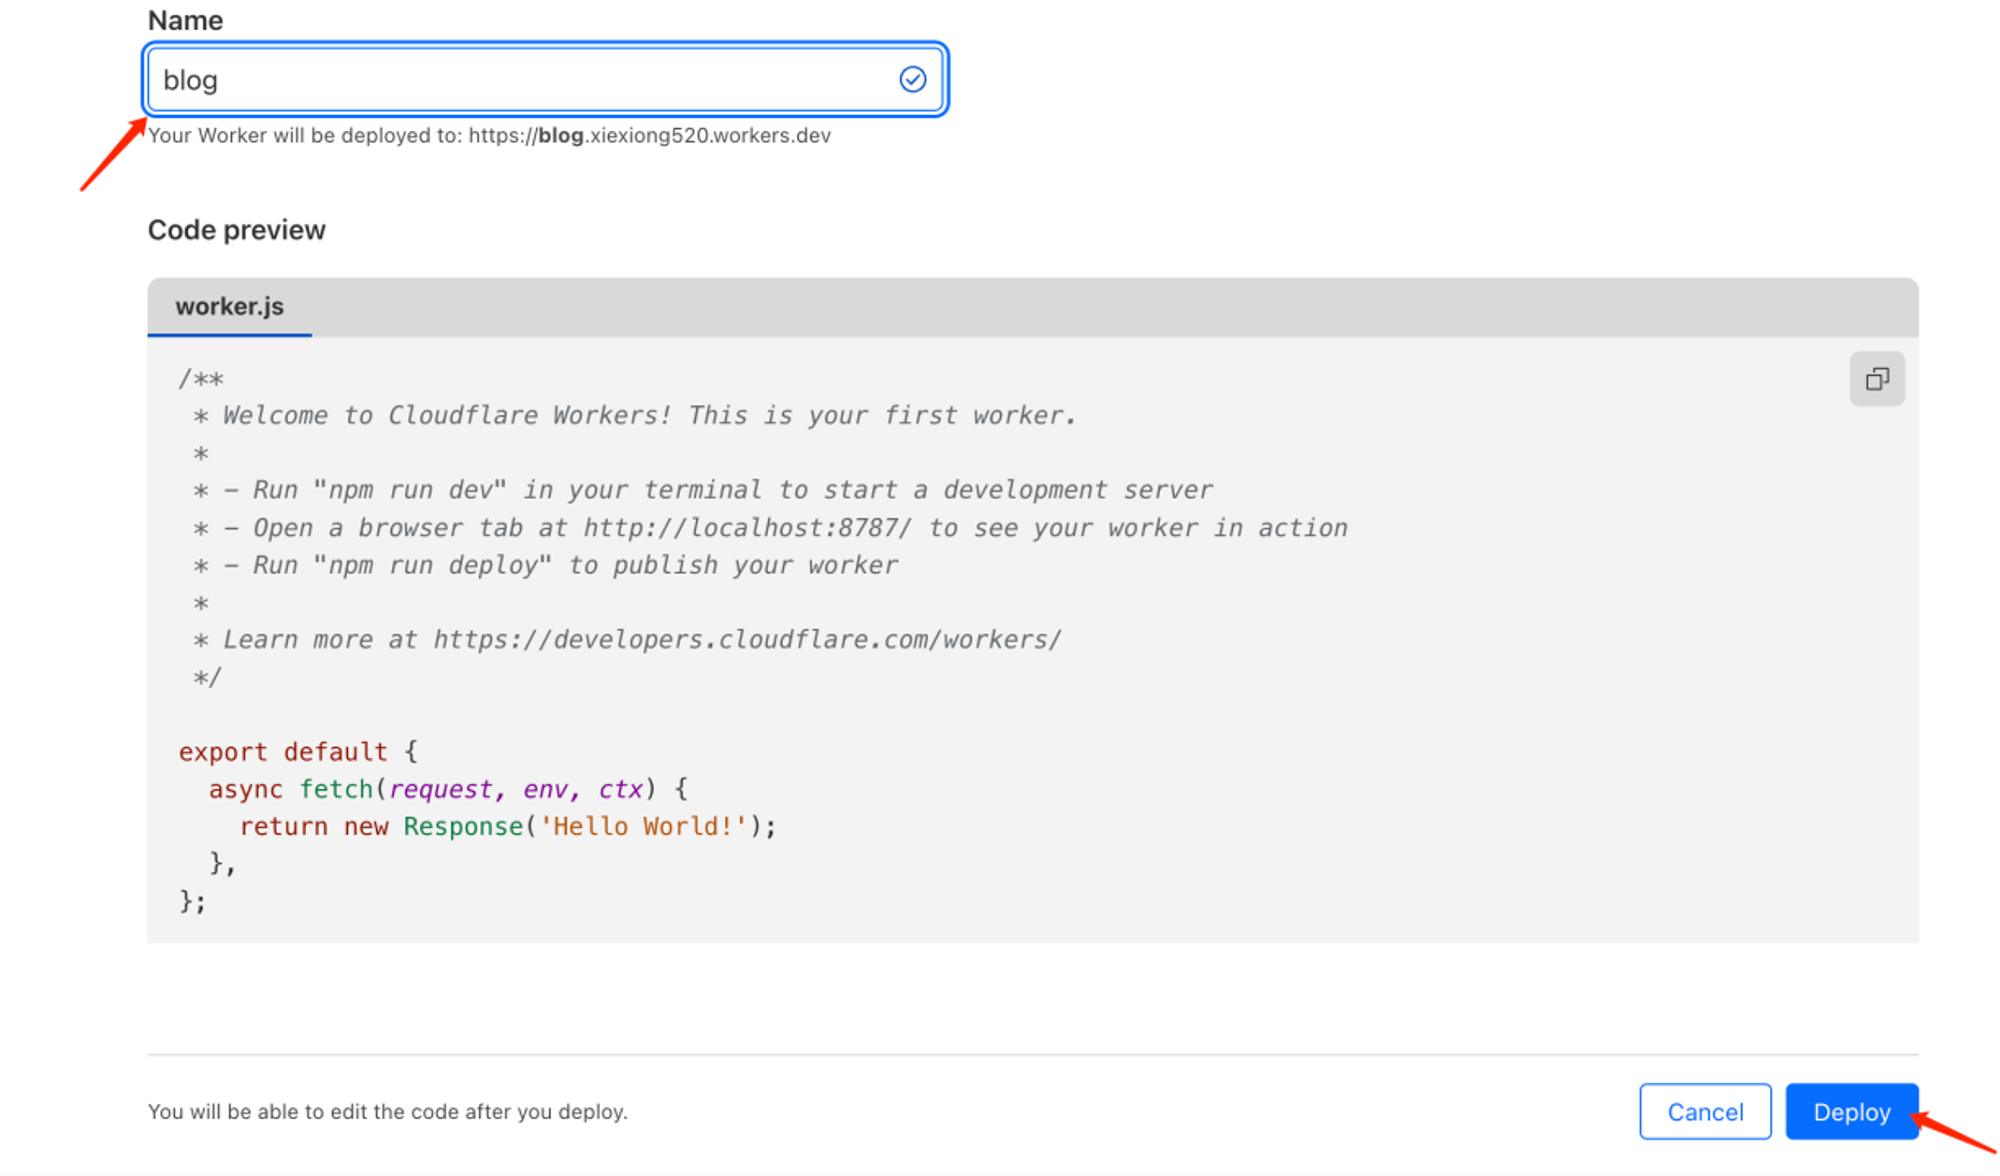
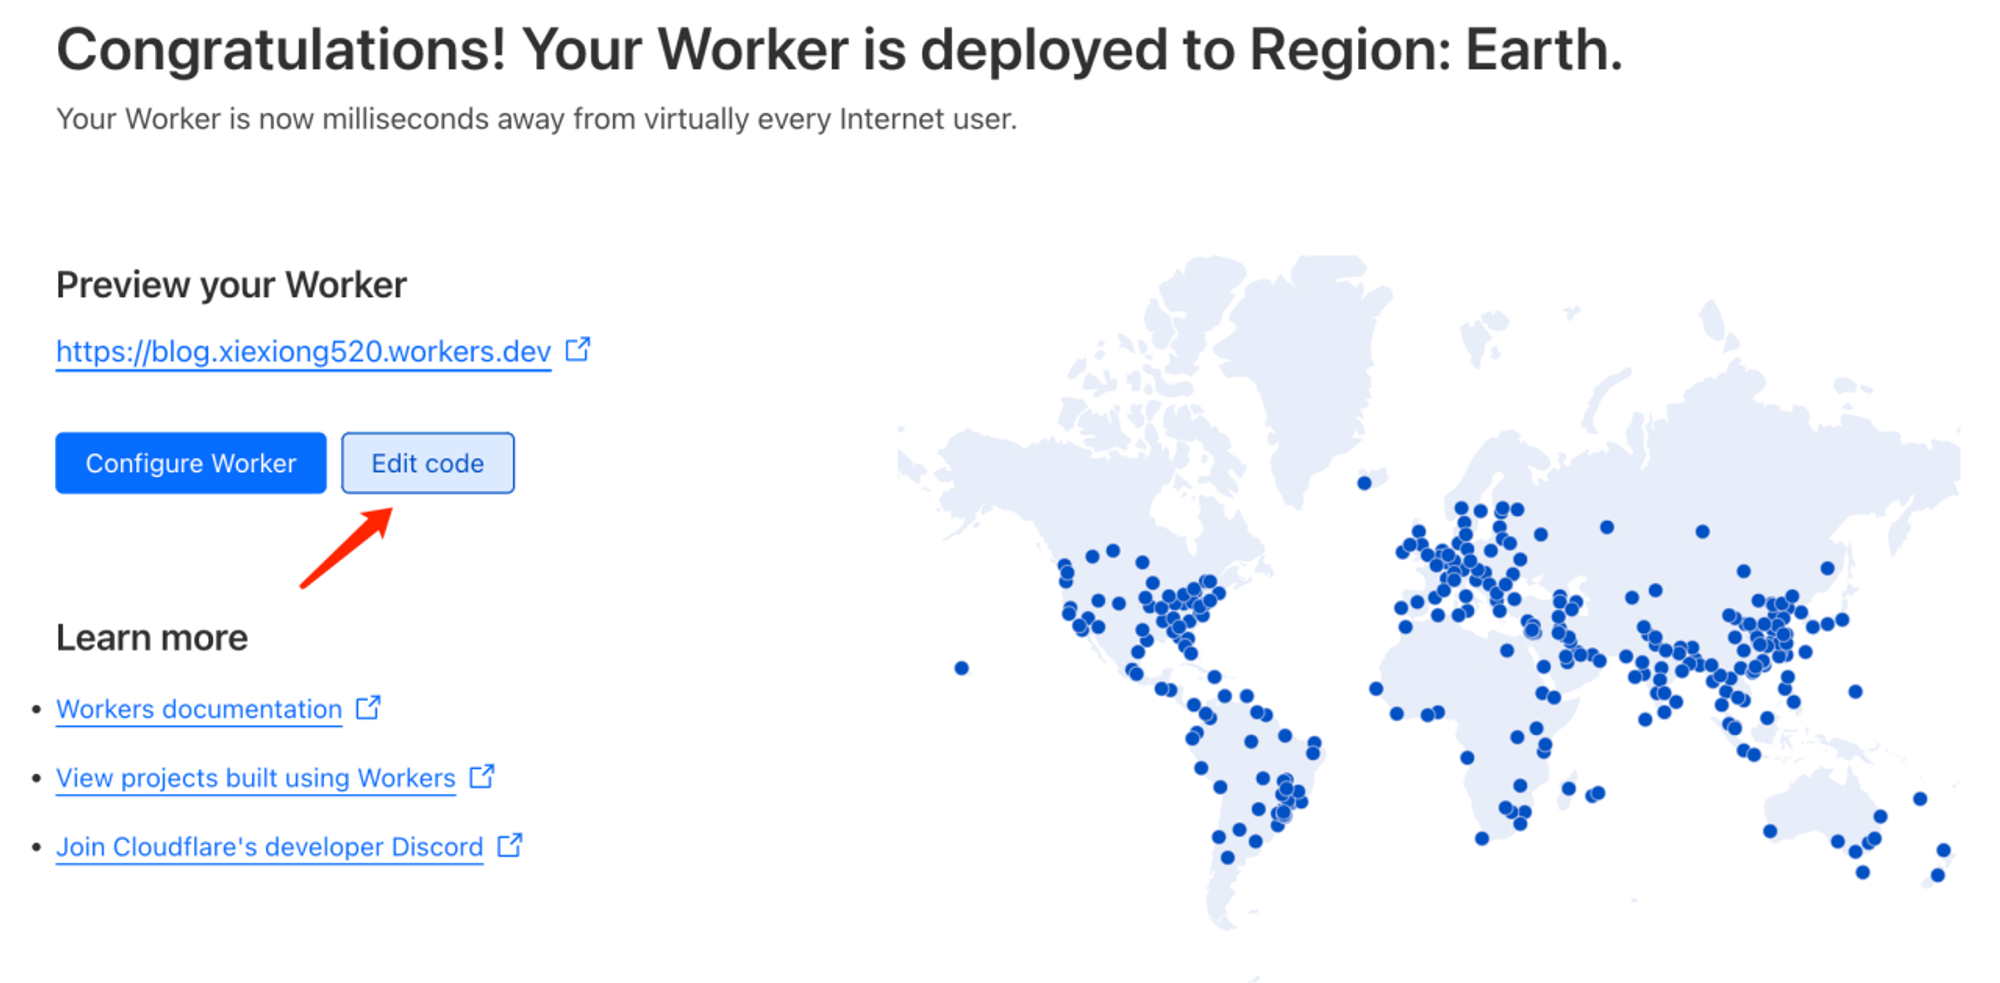
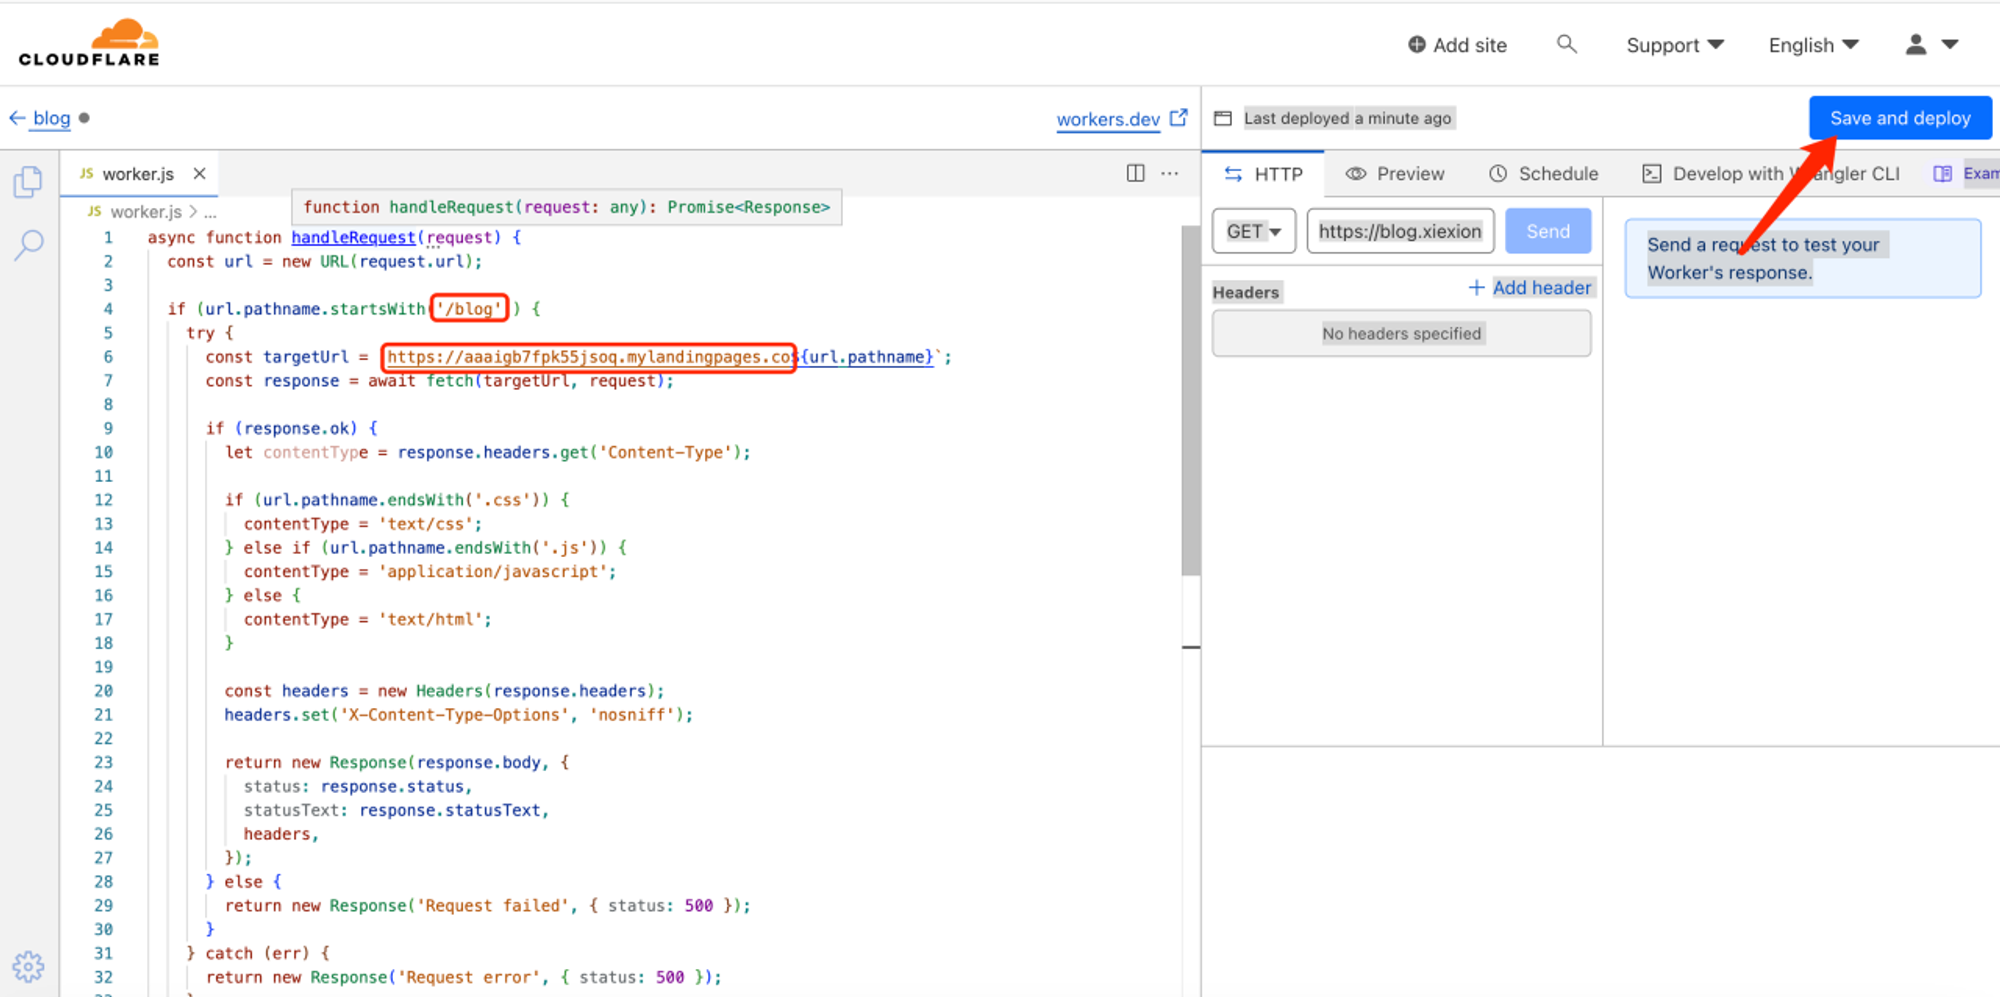
Click Edit code, Copy the following code, Needs to be modified startsWith and targetUrl, where targetUrl is the domain name assigned to you by QuickCreator.
Edit code
sample code
async function handleRequest(request) {
    const url = new URL(request.url);
    if (url.pathname.startsWith('/blog')) {
        try {
            const targetUrl = `https://aaaaurp3sv2in3xd.mylandingpages.co${url.pathname}`;
            const response = await fetch(targetUrl, request);
            if (response.ok) {
               let contentType = response.headers.get('Content-Type');
               if (url.pathname.endsWith('.css')) {
                   contentType = 'text/css';
               } else if (url.pathname.endsWith('.js')) {
                   contentType = 'application/javascript';
             } else {
                contentType = 'text/html';
             }
       const headers = new Headers(response.headers);
       headers.set('X-Content-Type-Options', 'nosniff');
       return new Response(response.body, {
           status: response.status,
           statusText: response.statusText,
           headers,
       });
      } else {
         return new Response('Request failed', { status: 500 });
       }
    } catch (err) {
        return new Response('Request error', { status: 500 });
    }
}
return fetch(request);
}
addEventListener('fetch', event => {
event.respondWith(handleRequest(event.request));
});
Deploy
Click Save and deploy
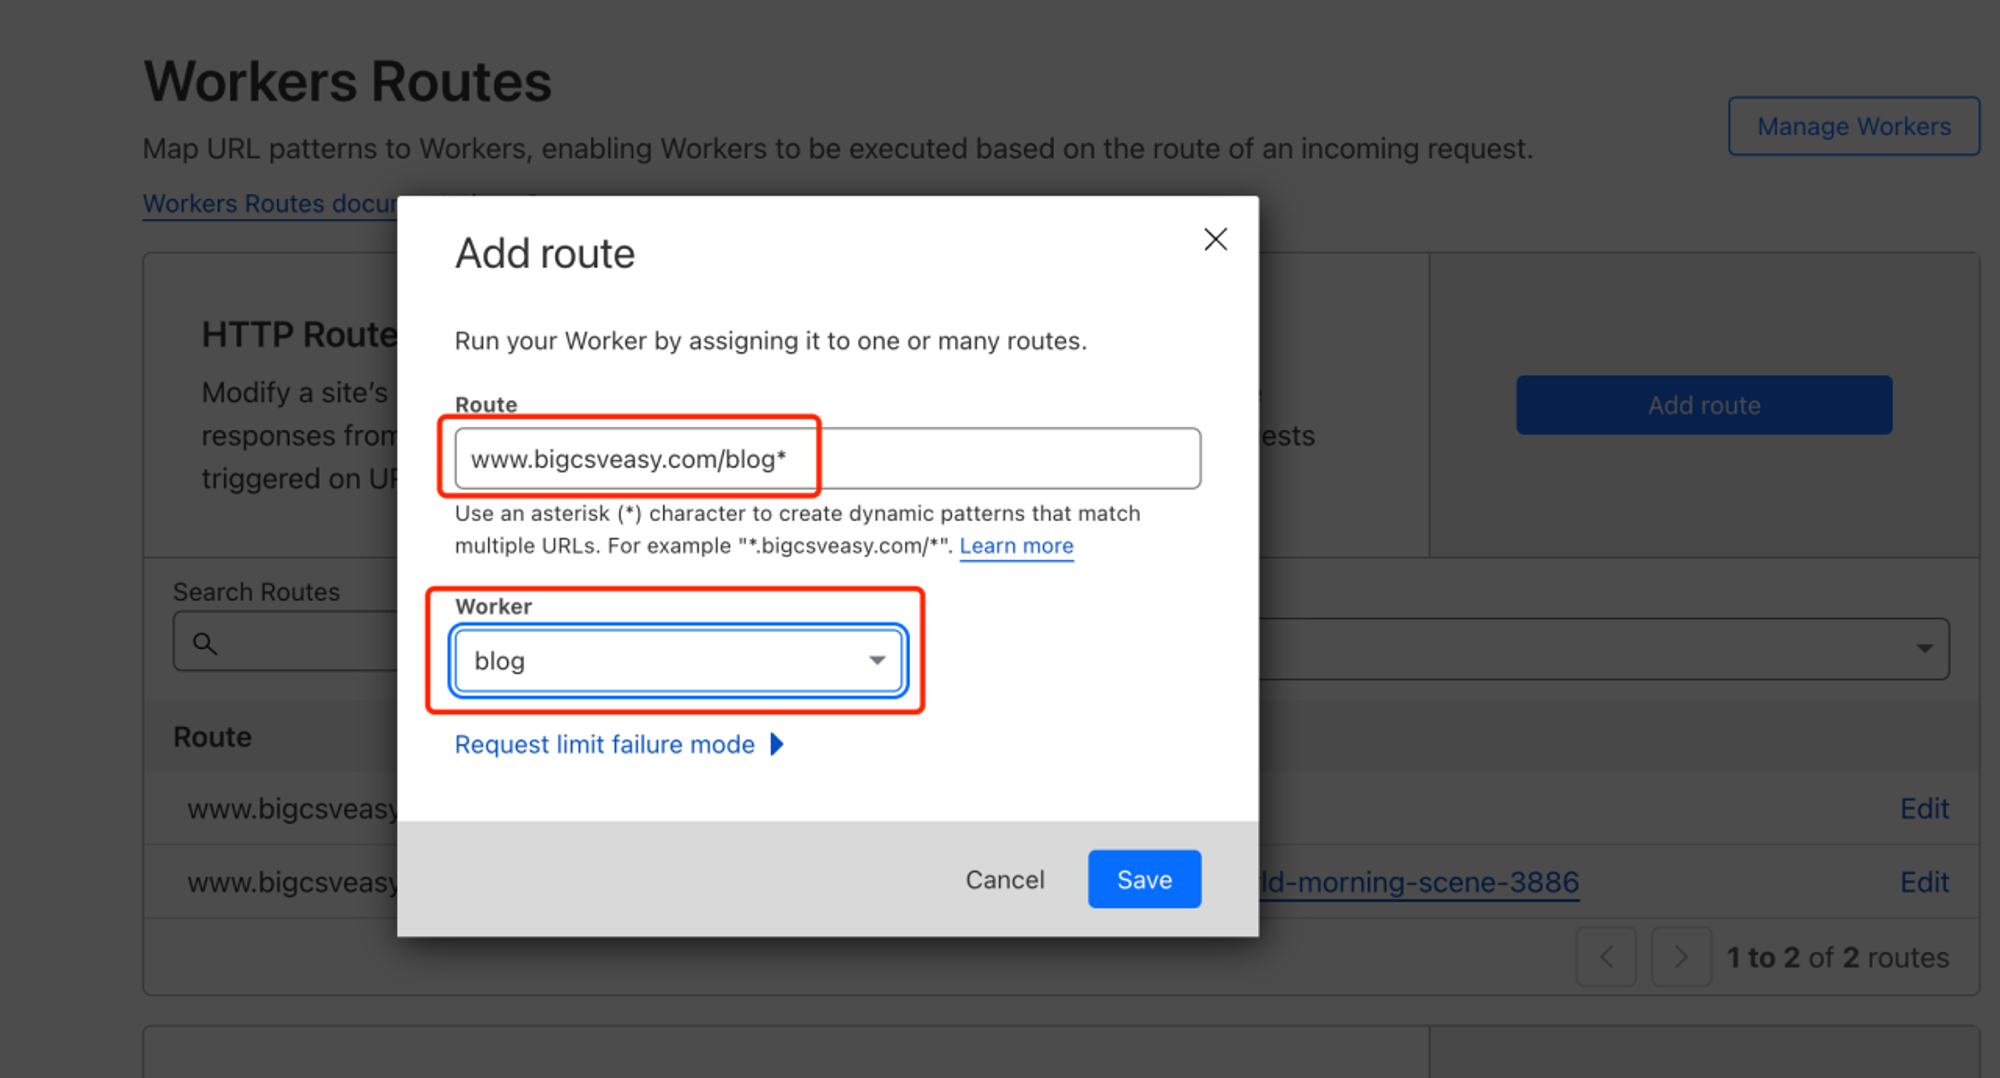
Add Worker route
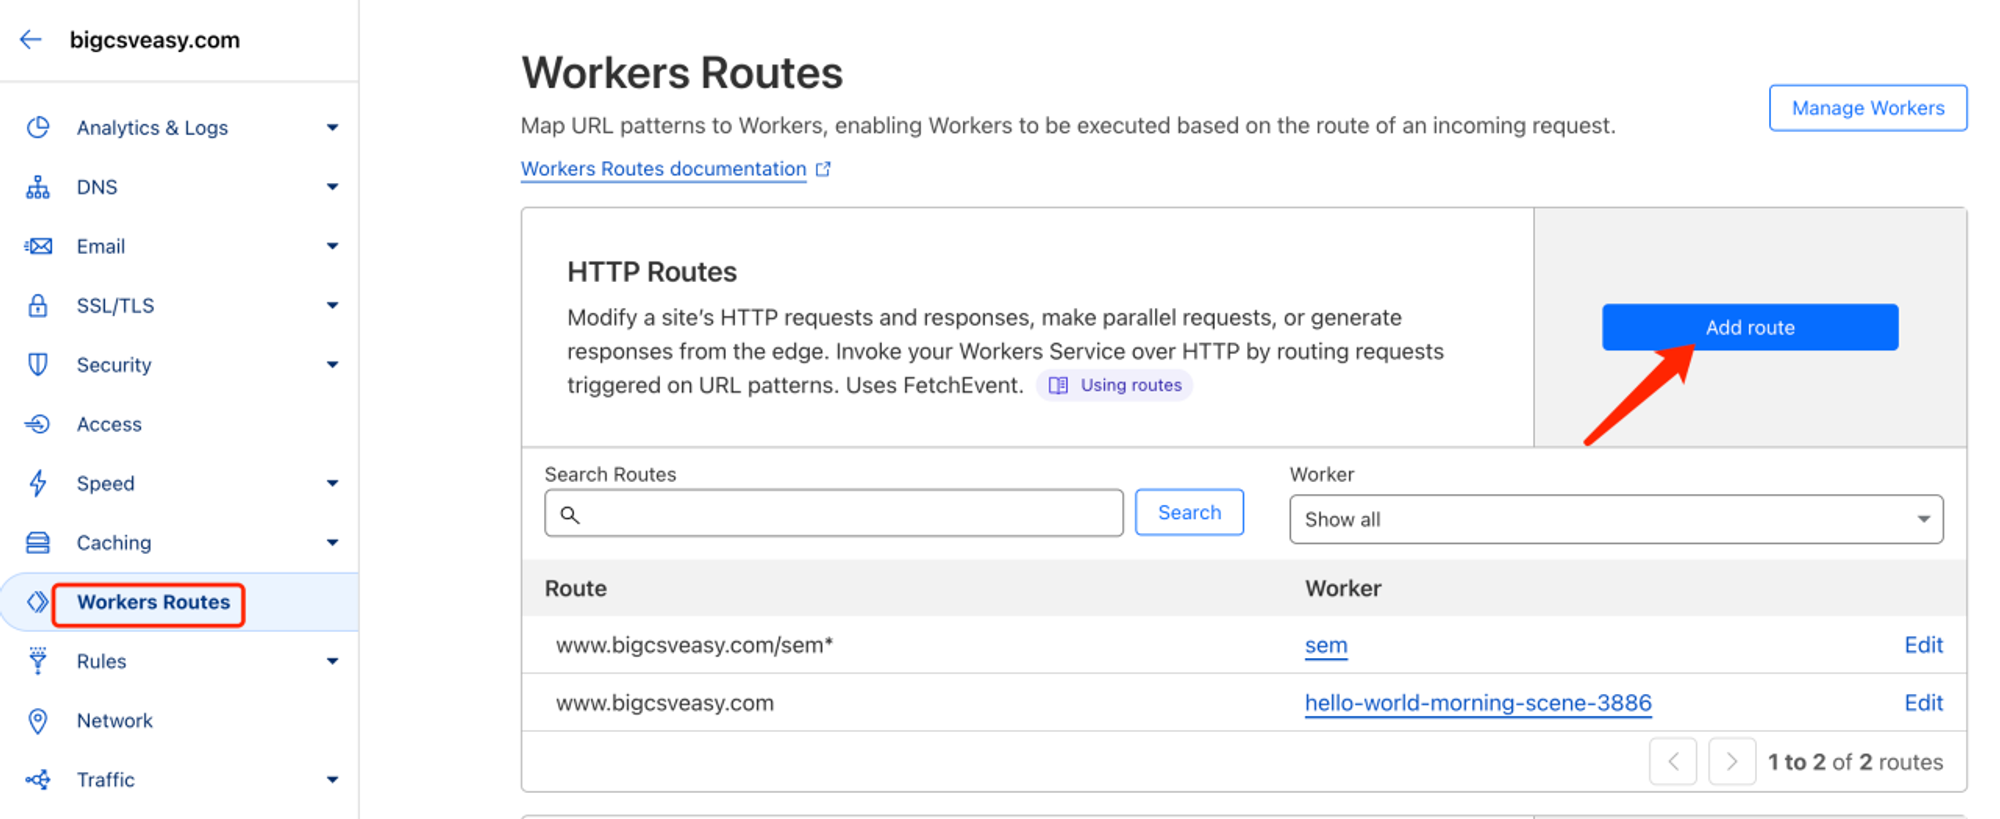
Select Route e.g. bigcsveasy.com/blog* , note that there must be a * at the end, select Worker e.g. blog, click save, then you can use bigcsveasy.com/blog to browse the blog or page created by QuickCreator.
Config your domain
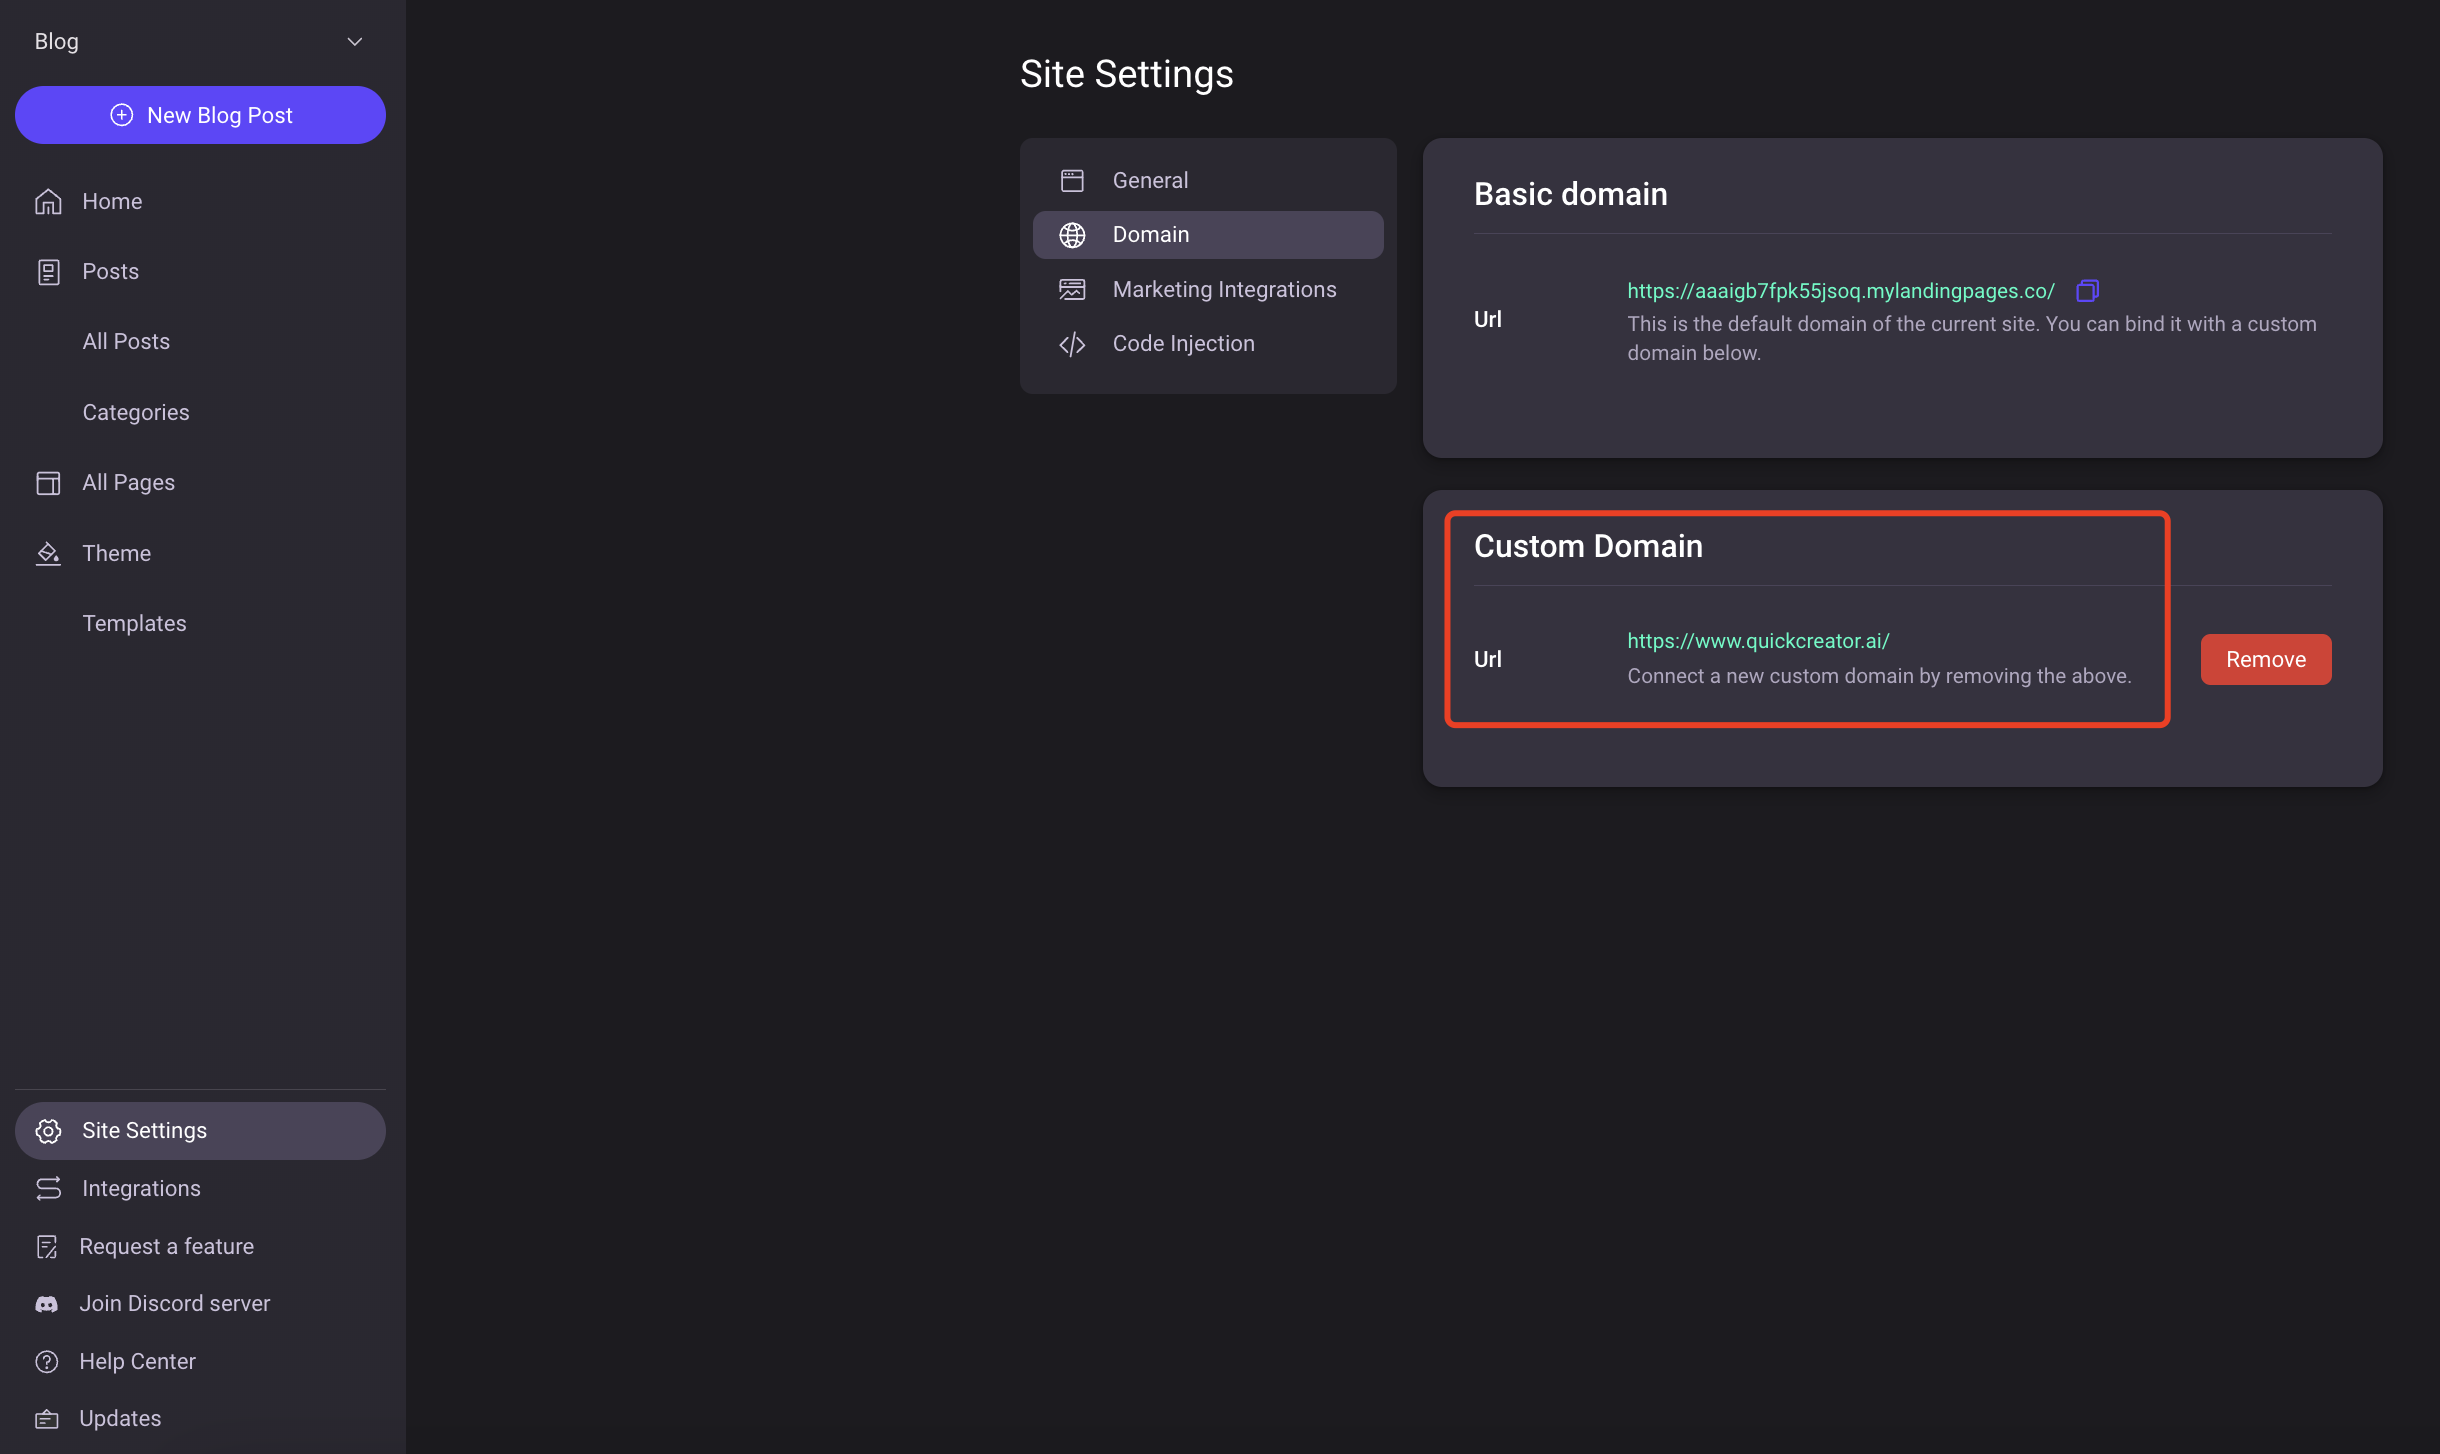
Configuring Custom Domain in QuickCreator, using subdirectory
Cloudfront + API Gateway
Create API Gateway
Bind the domain and subpath, then obtain the Basic domain URL.
- Bind the domain and path using "Use my domain subdirectory," then copy the Basic domain URL.

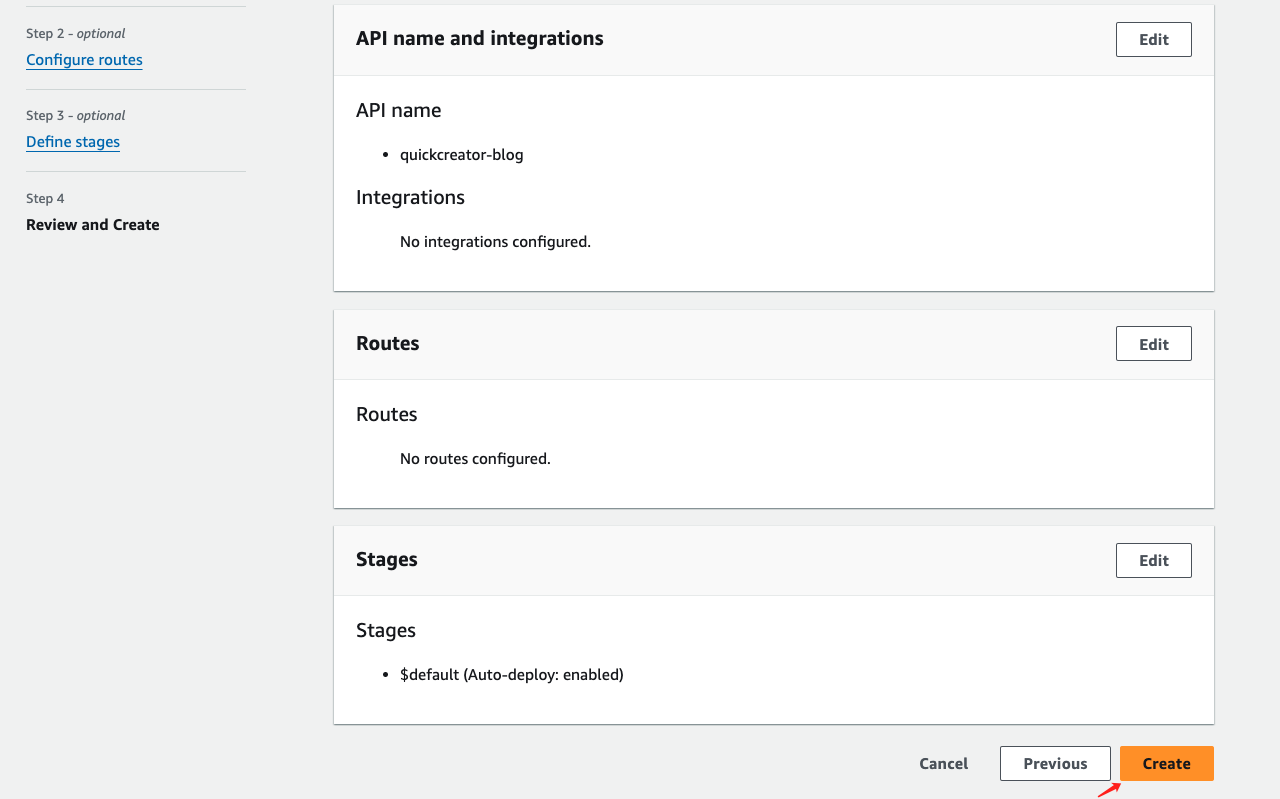
- Create API Gateway
- Select HTTP API
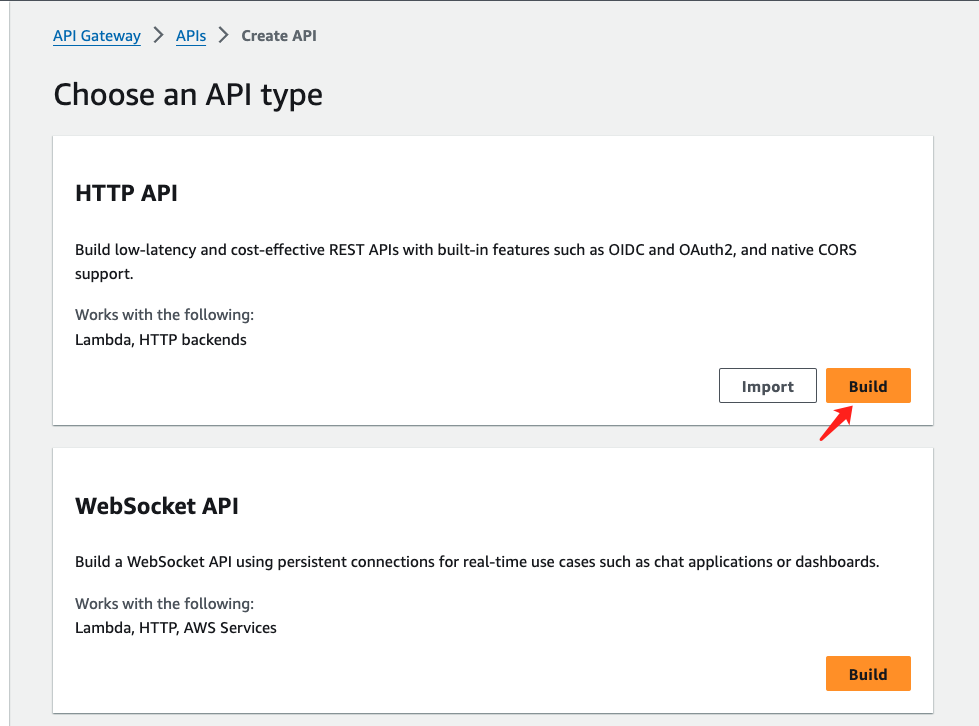
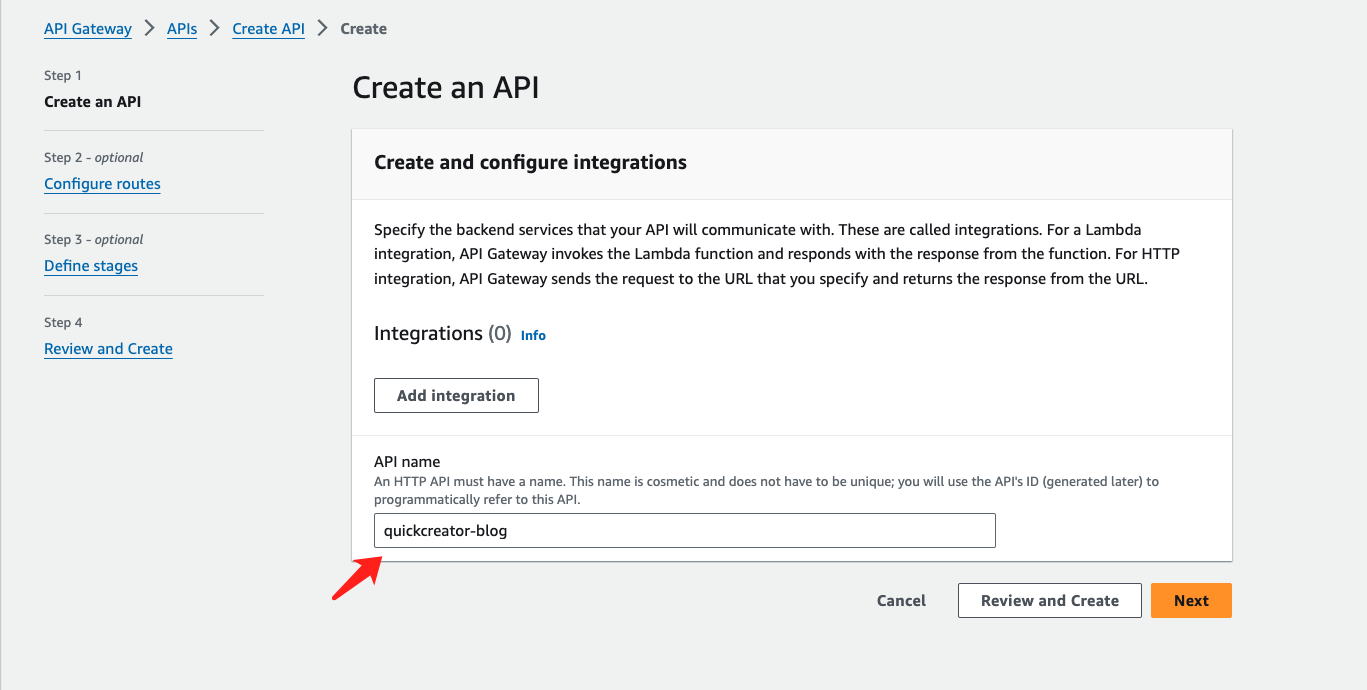
- Enter the API Name, for example:
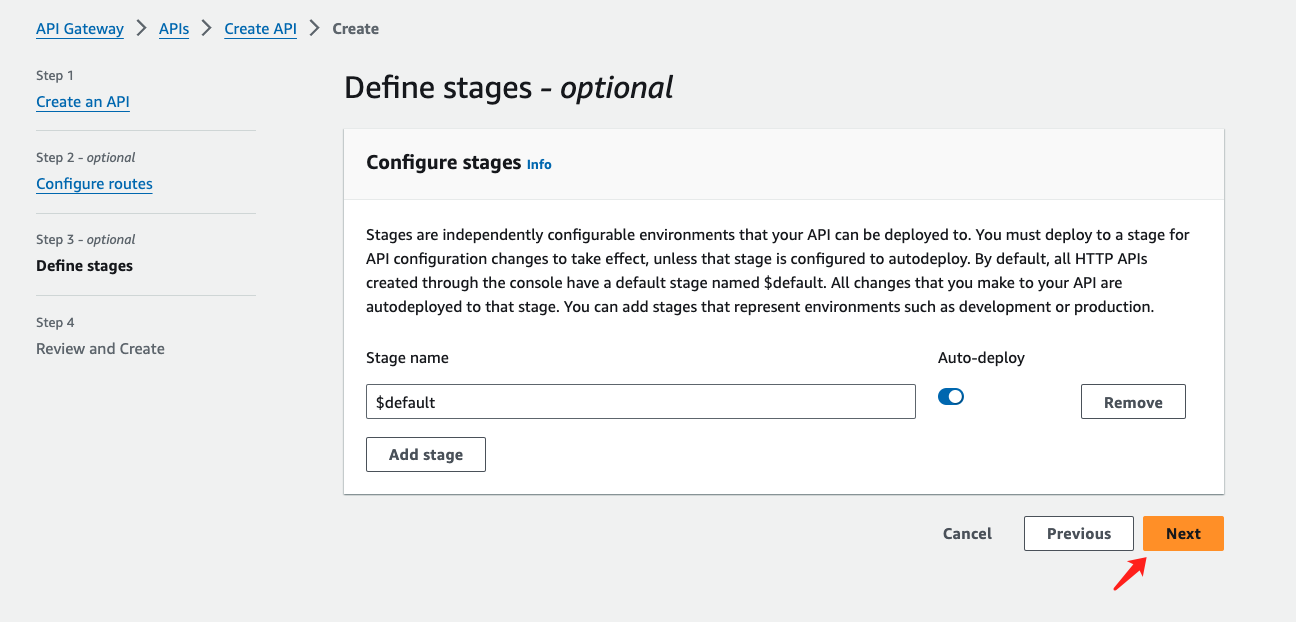
quickcreator-blog, and keep the other settings as default. Then create the API Gateway.
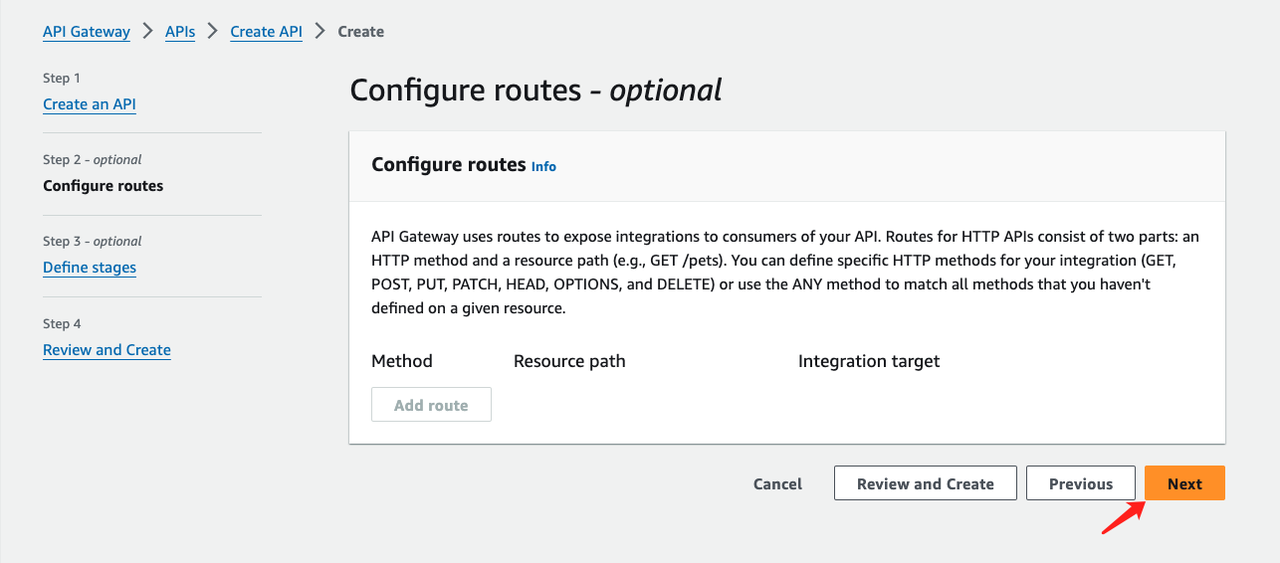
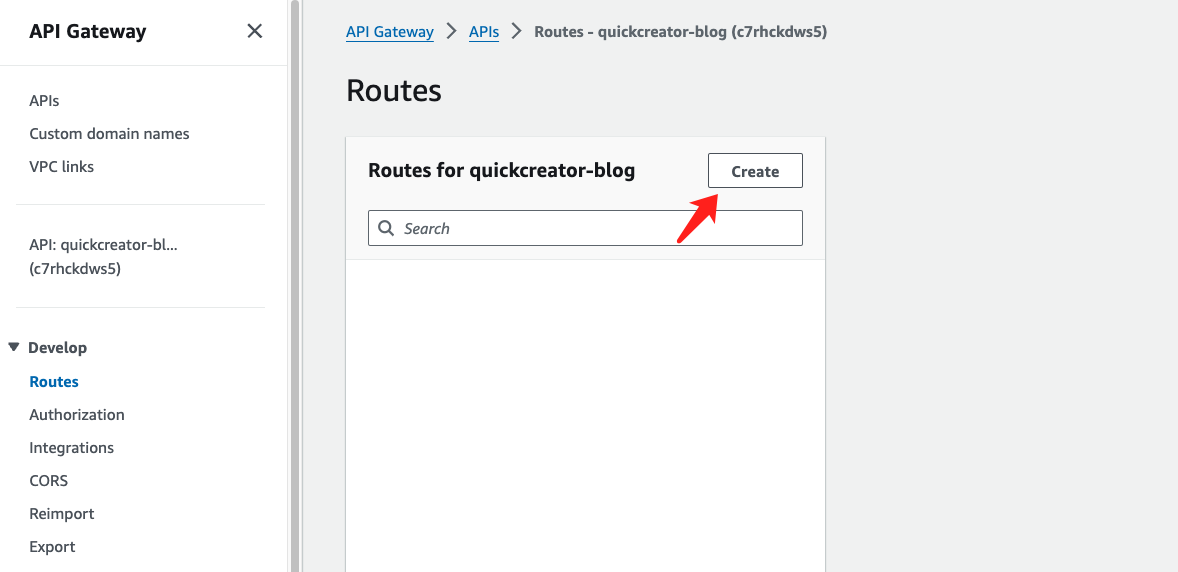
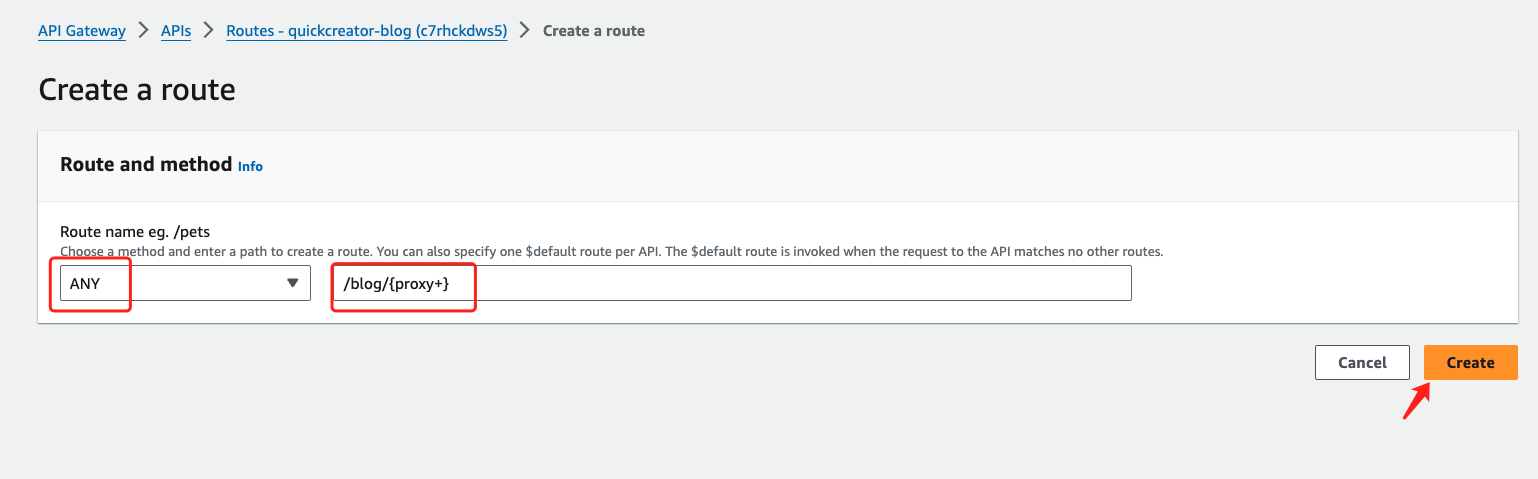
- Create router
Select "ANY" and enter /blog/{proxy+}.
The route /blog must match the subpath bound in step 1. {proxy+} is standard syntax.
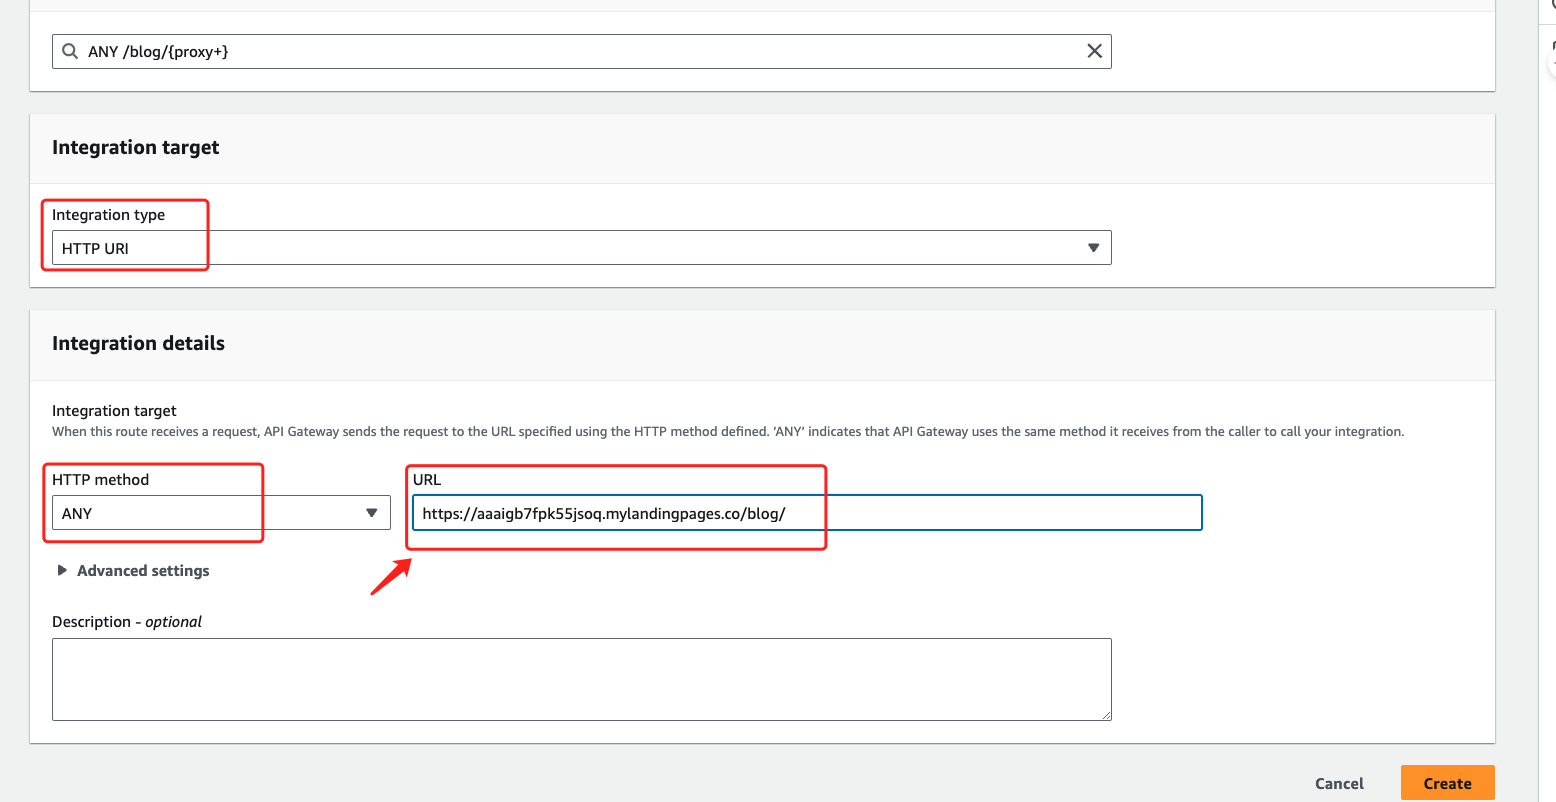
- Bind backend resources
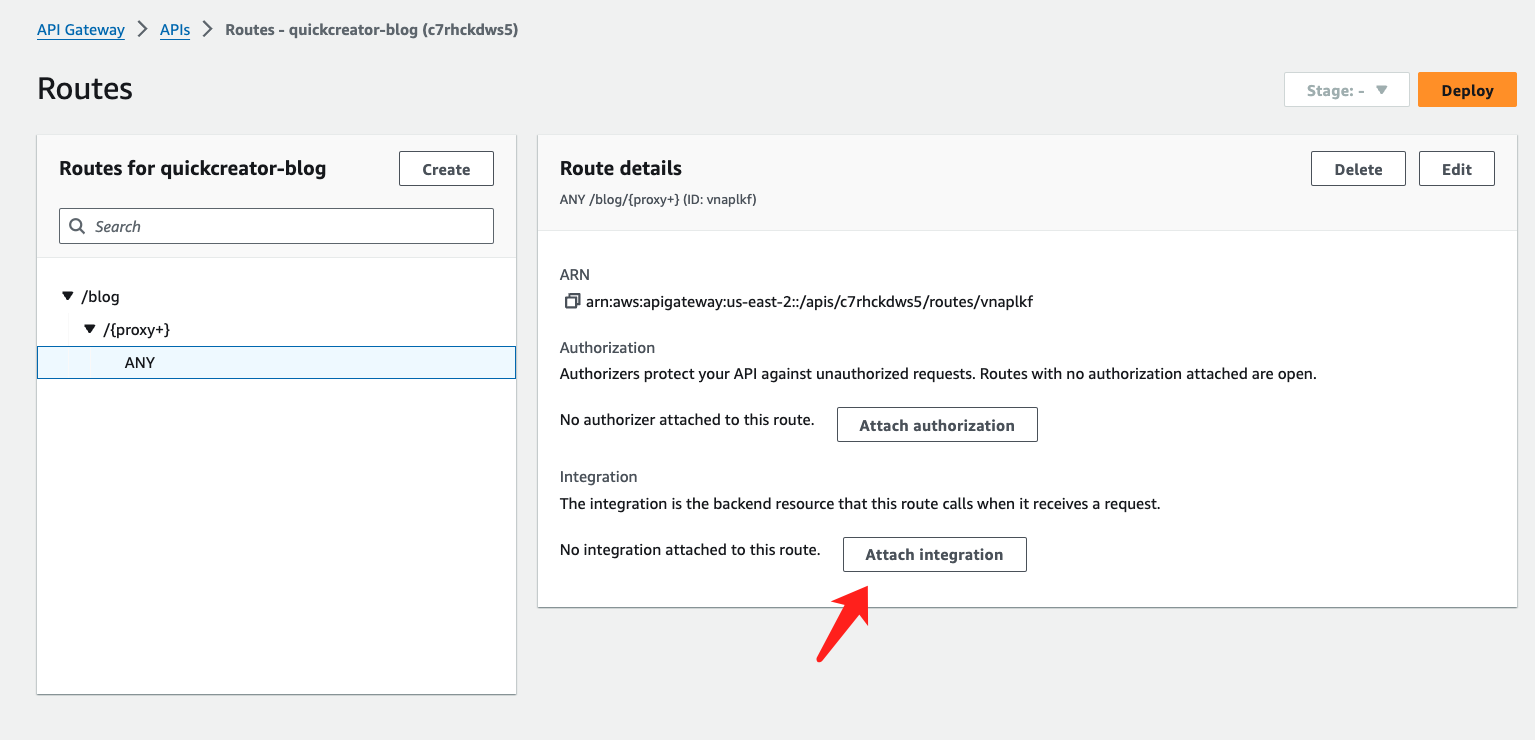
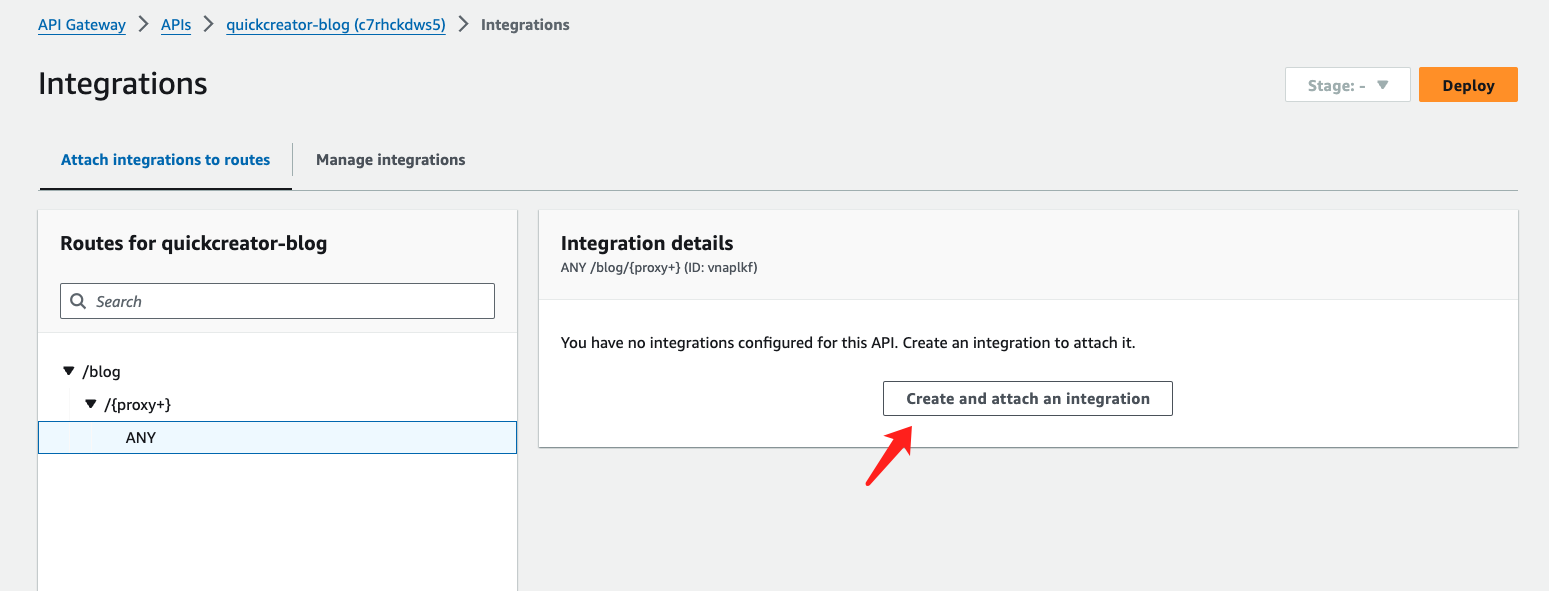
- In Integration type, select HTTP URL. In Integration details, select HTTP method ANY. Paste the URL copied in step 1 into the URL field, then click "Create" to create.
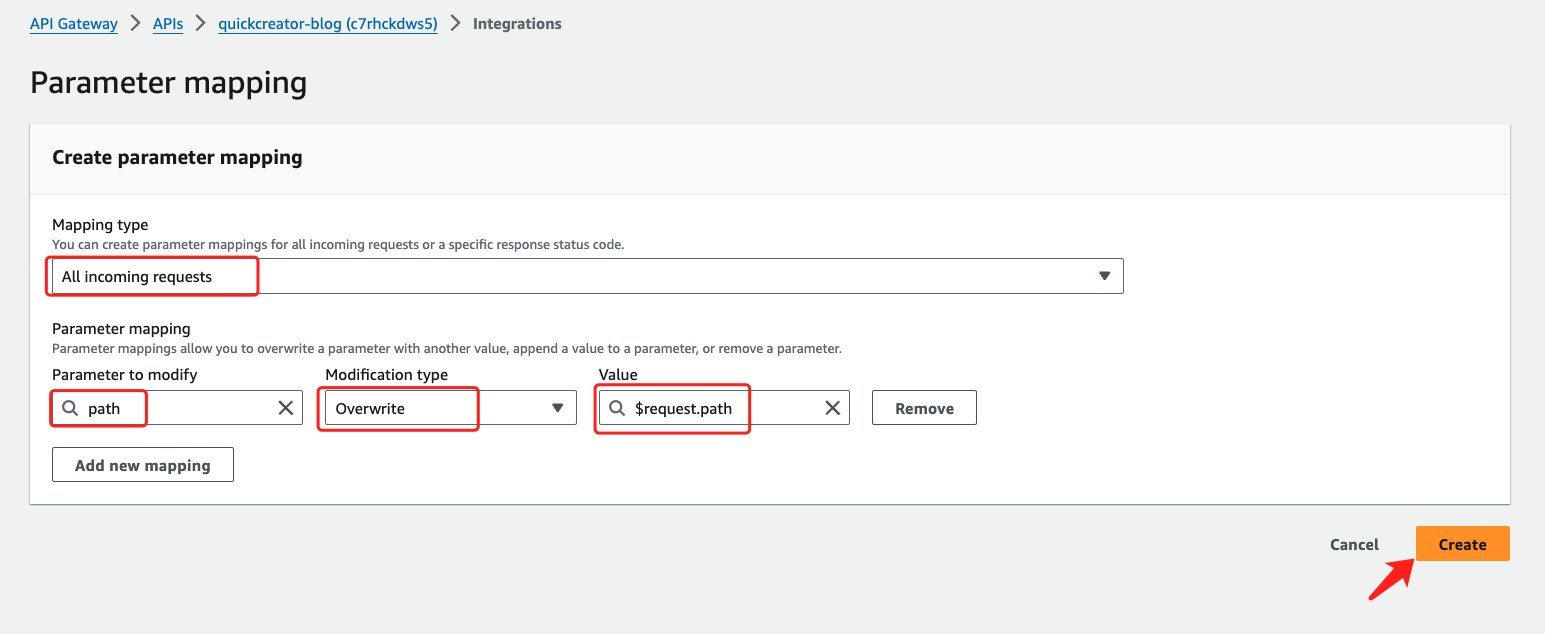
- Set parameters
In the Routes details page, select "Configure".
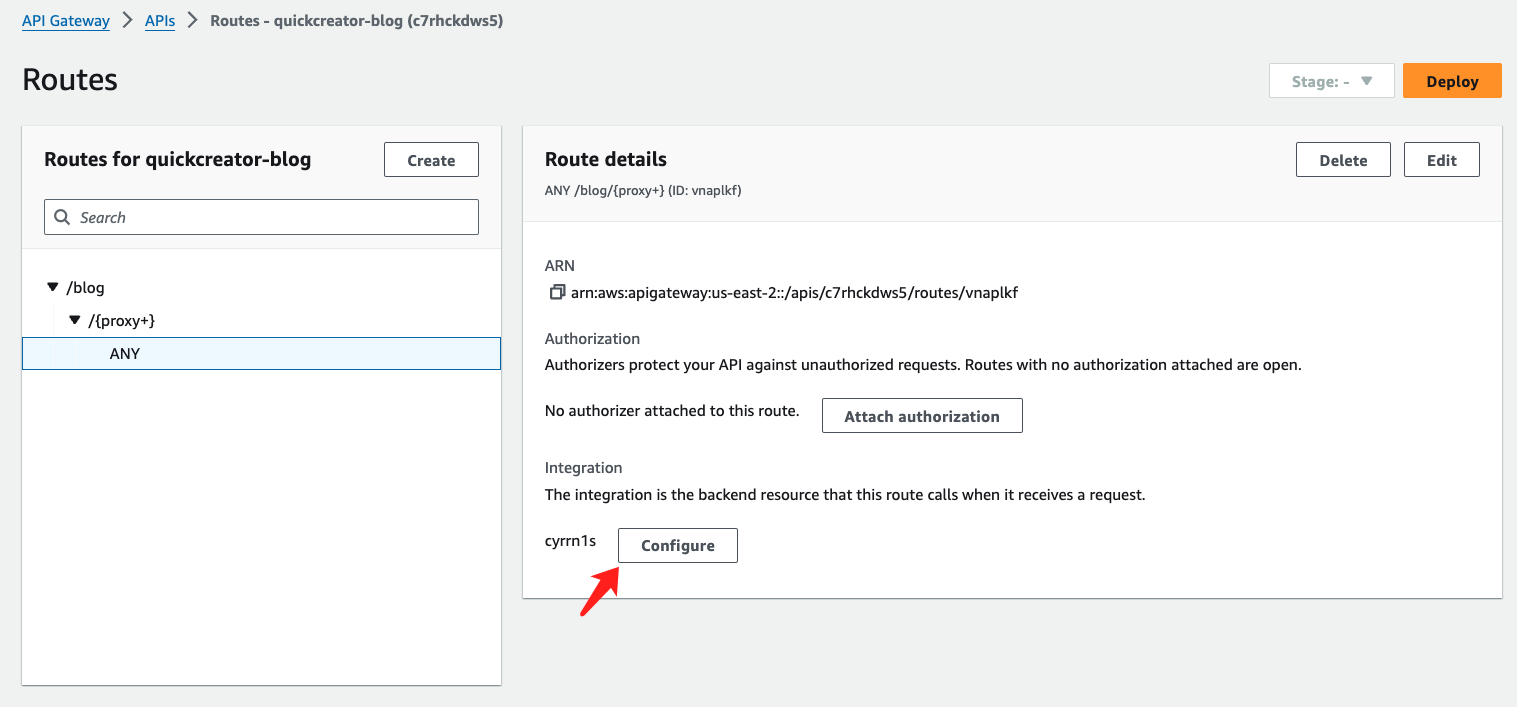
In the Integration details page, select "Create parameter mapping".
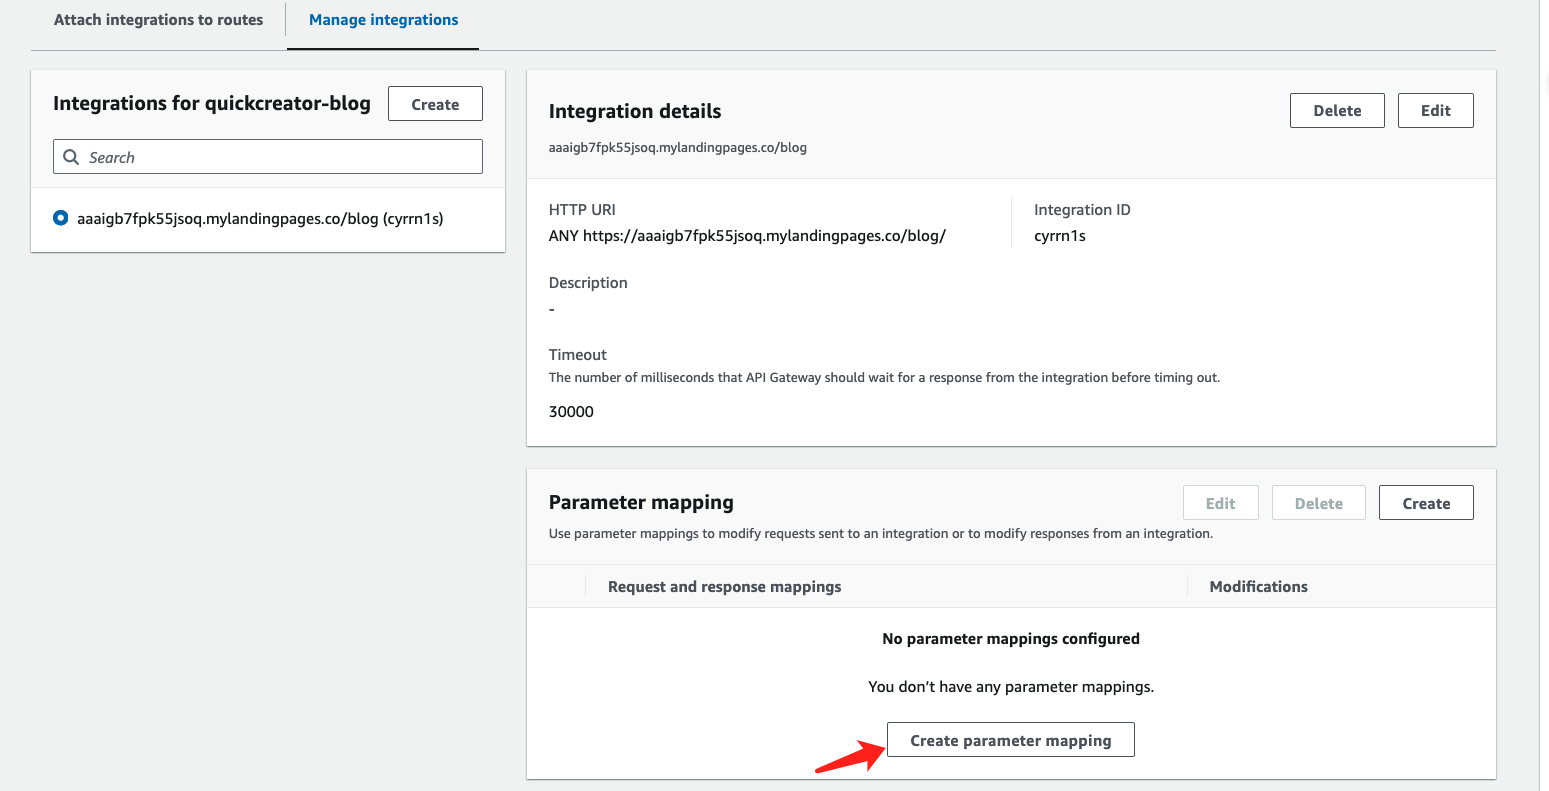
In the Parameter mapping page, under Mapping type, select "All incoming request". Under Parameter mapping, choose "path" for Parameter to modify. Select "Overwrite" for Modification type. Choose "$request.path" for Value. Click "Create" to finish.
Bind Cloudfront
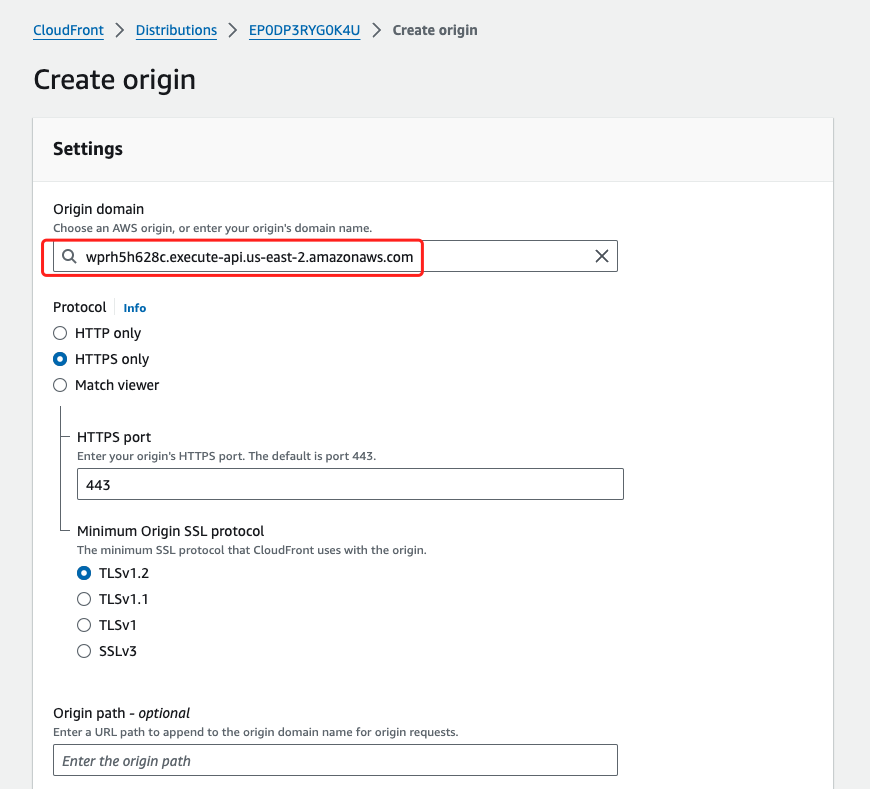
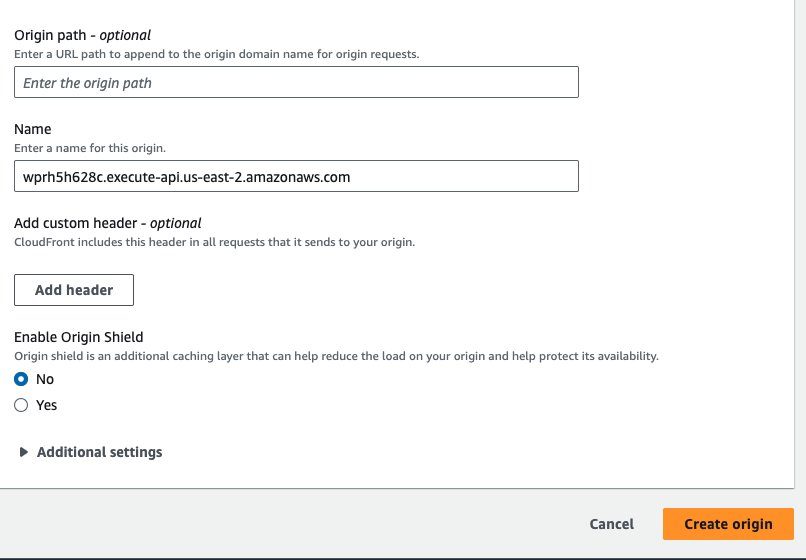
- Create API Gateway Source
Choose CloudFront to create an API Gateway source. In Origins, click on "Create origin".

Choose the API Gateway created earlier from the Origin domain dropdown menu. Select "HTTPS only" for Protocol. Click "Create origin"
- Create Behavior
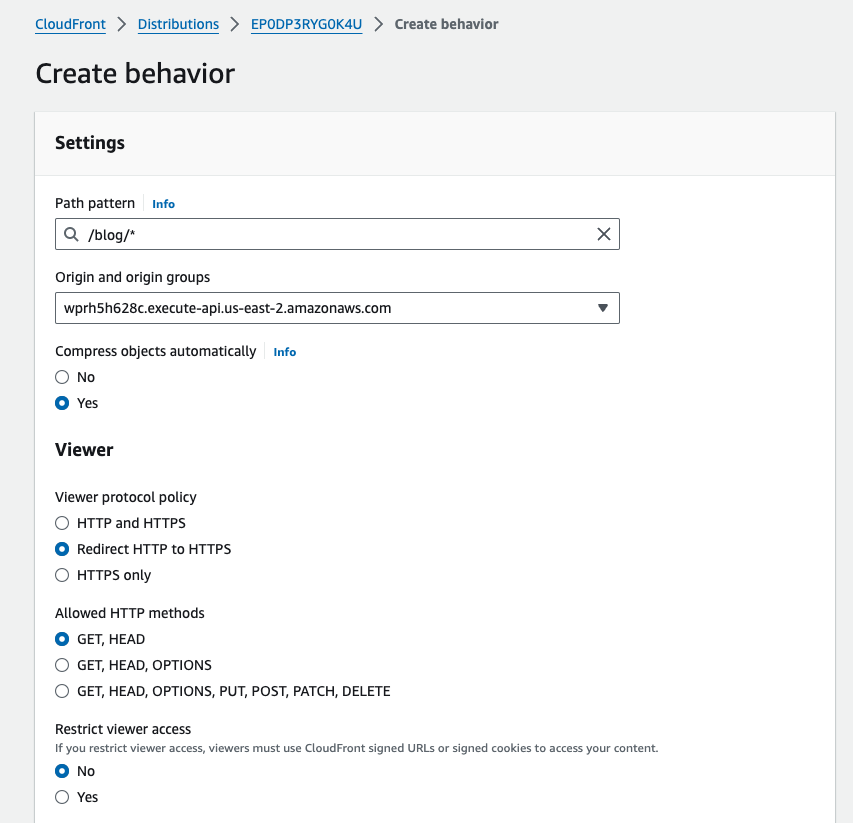
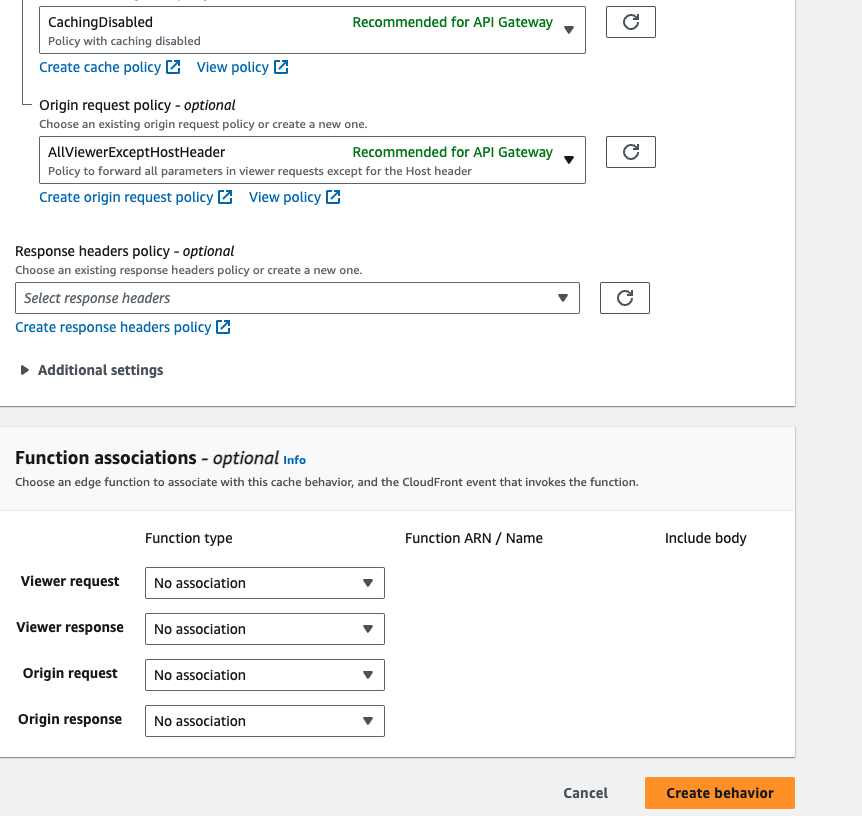
Choose CloudFront. In Behaviors, click on "Create behavior".

Enter "/blog/*" in the Path pattern field. Choose the API Gateway source created in the previous step from the Origin and origin groups dropdown menu. Select "Redirect HTTP to HTTPS" for Viewer protocol policy. Choose the appropriate caching policy. Click "Create behavior".